Wednesday, August 30, 2017

DIY: Pottery Barn Patio Furniture Refresh


I'd been wanting a couch or sectional for our back patio for a while now; our toddler loves spending time in the back yard, so we spend tons of time out there with him.  We have a dining table and a couple of wicker chairs on the patio, but a couch seems so much more comfortable!  I started shopping around online and realized that patio furniture is NOT cheap - especially couches and sectionals since the cushions really add up in addition to the cost of the furniture itself!  On the low end, IKEA outdoor couches and sectionals start at $400-500, and more mid-priced options are well over $1,000-1,500.

Enter a secondhand sectional!  I LOVE Facebook garage sale/resale pages - the one in our neighborhood is especially active and great deals can be scored on there all the time!  I like that our page is local (meaning we won't have to drive too far to pick up), and it feels less shady than buying off Craigslist (since you have to know someone personally to get into the group and I can check out our mutual friends before buying).  

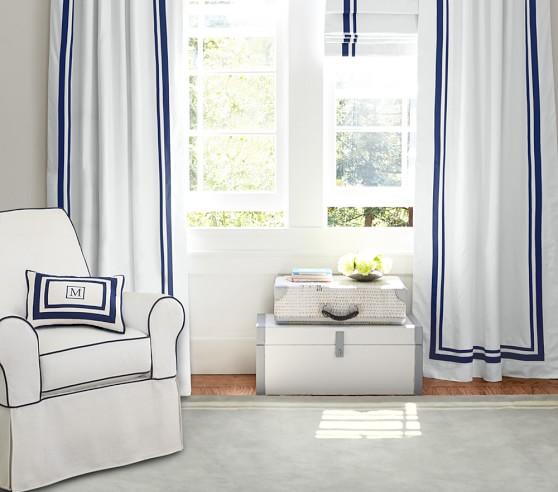
One of my friends from the neighborhood bunco group posted her Pottery Barn Chatham sectional for only $50 - it was in good shape but they're changing their patio setup to accommodate a dining table and needed it gone!  It's still sold at Pottery Barn - for the configuration she was selling (including coffee table and cushions), it costs a whopping $2,381 new (plus over $500 in shipping and taxes).  Although it needed some TLC, I was willing to risk $50 on a $3,000 outdoor sectional!  


The cushions were a natural "canvas" color but had some mildew/mold from being left outside in the elements all winter.  The sectional and coffee table themselves are wood (mahogany) but had some slight fading from the sun (the coffee table worse than the sectional).  Overall, though, the cushions were still firm, there were no holes or rips in the fabric, and the wood was very sturdy.  My father-in-law came over last weekend with his pickup truck to help us pick it up, and then we went to town giving it a little refresh!

Luckily, the cushion covers zip off!  I ran them through the washer with a hefty dose of Oxiclean, which got rid of many of the stains.  For the tougher mold/mildew stains, I tried Oxiclean spray, soaking in Oxiclean and hot water, and borax, which all helped some but didn't do the job completely.  Finally (I wish I had started here), I mixed up a solution of 1 part bleach to 8 parts water in a spray bottle.  The fabric care instructions say not to use non-chlorine bleach, but I tested the colorfastness on a hidden part of the fabric and it didn't change the color, so I decided to go ahead.  

The bleach spray worked great and got rid of EVERY trace of mold or mildew that was on the covers!  They look brand new!  I was thrilled with this since new cushions alone run over $500 (before shipping or tax!)  Since the inserts were in good shape, once the covers were clean, they were good to go!  We plan to bring them inside (or store in a deck box) when not in use to keep them from getting so mildew-y again, since I am not sure what the effects of continued bleaching might be (plus they are a hassle to zip on and off).

As for the sectional and coffee table wood, the stain was still in pretty good shape, but there was some sun bleaching and the wood was looking a little dry.  Since the Pottery Barn website says they are made from mahogany and the wood wasn't heavily varnished, we refreshed the wood using this teak oil.  We applied a couple of coats using rags (my husband's old hole-y undershirts).  It took less than an hour for the two of us to do the entire sectional plus the coffee table.  The sectional looks SO much better!  The coffee table was in worse shape so it looks better but still not perfect (it probably needs to be sanded and restained but we didn't want to hassle with trying to match the stain on the sectional right now).  We let the wood dry outside for a couple of days before putting the cushions back on.

Overall, we are thrilled with how it turned out - especially considering it was only a $60 investment ($50 for the furniture and $10 for the teak oil).

Monday, August 28, 2017

DIY: Pottery Barn Kids Harper Look-alike Curtains


I am in love with Pottery Barn Kids stuff for baby and toddler rooms, but sometimes the price tag is just too much to swallow!  When I started planning C's "big boy" room, I loved the look of the PBK Harper curtain panels, but (for the 96" length I wanted), they are $79 (+ tax and shipping) EACH!  

Image result for pottery barn kids harper curtains


As much as I love them, I could not justify almost $200 on curtain panels for my toddler's room!  Like I did a with the rugby striped curtains in the nursery, I decided to try to DIY a less expensive version with a similar look.  

Supply list:


I bought a pair of 98" white RITVA curtains from Ikea for $24.99 (for the pair! I just tossed the included curtain tie-backs since I wanted the panels to hang straight.)  To be fair, these are not true blackout curtains like the PBK ones are, but we have plantation shutters that block out plenty of light, so blackout curtains weren't necessary for us.  
Image result for ikea ritva curtains

I wanted a similar look to the navy and white Harper curtains, so I bought navy grosgrain ribbon in both 5/8" and 2.25" widths on Walmart.com.  I got a 10-yard spool of the 2.25" ribbon and 3 5-yard spools of the 5/8" ribbon, which cost a total of $14.53.

Since the curtains are 100% cotton and say they have approximately 4% shrinkage, I washed and dried the curtains before starting to make sure that I didn't encounter any unwanted shrinkage or bunching in the final product.  And, since they are 100% cotton....they came out a wrinkled mess!  I spent FOREVER ironing them (with steam! and starch!) to get them flat again.  

After ironing, I hung the curtains up on the curtain rod in C's room to see how much excess length there was.  Since we have 96" ceilings and the curtain rod is a few inches from the ceiling, the 98" length was slightly too long.  I used straight pins to pin the curtains to the desired length (just skimming the floor).  Make sure to do both panels since they may have shunk to slightly different lengths!

After pinning up the excess, I used iron-on hem tape to hem each panel.  This would also be easy to do on a sewing machine, but I already had hem tape on hand, and I didn't want to get my sewing machine out and set it up just to sew 2 straight hems.

Inline image 2

I laid each curtain panel flat on our living room floor to glue on the grosgrain ribbon using permanent fabric glue (make sure it is washable!)  

Inline image 3
Starting with the 2.25" ribbon, I used a small amount of hot glue to glue down the end at the top of the curtain panel (folding under the edge of the ribbon to keep it from fraying), then used the fabric glue to adhere the rest of the ribbon (since hot glue will probably come undone if the curtains are washed and dried, I didn't want to do the whole panel using hot glue).  I used a piece of cardboard as a template to make sure that I was keeping the ribbon straight and an even distance from the edge of the curtain panel.  I also used a large piece of cardboard under the curtain panel to prevent any fabric glue from soaking all the way through onto our hardwood floors.  

I applied fabric glue to the underside of about 2 feet of the ribbon at a time, then pressed it onto the curtain using my hand, before moving on to the next 2-foot section of ribbon. When I got to the corners, I again folded the ribbon (I did not cut it) to form a corner and used hot glue to secure it, since it held better (i.e., more immediately) than the fabric glue.


When I finished gluing the 2.25" ribbon all the way around each panel, I then glued down the 5/8" ribbon, again using a cardboard template to make sure I was keeping it an even distance from the 2.25" ribbon in a straight line.

I am so happy with the finished product!  It achieved the look I was going for at a fraction of the cost of the PBK version.  My total cost was less than $50 for 2 curtain panels (approx. $30 curtain panels + $15 ribbon + $5 fabric glue, since I already had the iron-on hem tape).

Friday, August 25, 2017

Friday Favorites: Favorites under $10

Yay, Friday!  We have a weekend full of birthday parties and plans with friends - I can't wait!  This Friday I'm sharing some of my favorite recent purchases under $10...

Belvita Breakfast Biscuits

Nabisco belVita Breakfast Biscuits Cranberry Orange - 5 Count


Normally, I eat breakfast at work, since my company provides a free cafeteria with hot breakfast and lunch.  Since I'm home on maternity leave, I've had to figure out a quick and easy breakfast option to keep on hand.  I first tried these Belvita breakfast biscuits when they were included in the hotel "welcome bag" for my brother's wedding; now, I'm addicted and have tried 4 different flavors.  (My favorite are the cranberry orange and coconut; the blueberry are good too.  I like the cinnamon brown sugar the least so far).  There are 4 biscuits in each package, which makes them perfect for on-the-go (or one-handed while nursing) breakfasts.  Grocery stores generally sell them in a 5-pack, but Amazon has them at a better price in a 12-pack.


Gain Scent Booster

Gain Fireworks In-Wash Original Scent Booster 26.5 Oz

I am a sucker for good-smelling laundry, and I love these scent boosters that you add to the washing machine - the laundry comes out smelling great!  I'd been using the Dreft scent booster for a while and wanted something new.  The Gain scent booster smells amazing!


Love Unending devotional


I was looking for a new devotional and came across this Love Unending: Rediscovering Your Marriage in the Midst of Motherhood book.  I am loving it!  This book has 21 days of "challenges", reflections, and prayers to strengthen your marriage - simple things, such as greeting your spouse when they come home, forgiving your spouse quickly, and being intentional about thanking your spouse.  The focus of the book is on doing the things that came naturally at the beginning of your relationship (i.e., before kids) that sometimes fall by the wayside when we are stressed/busy/overwhelmed with raising a family.  I mostly love how "real" the author is in describing her own experiences.  I think it has definitely helped me change my attitude and my actions!


Braided 10-foot iPhone Charging Cord


Technically, these are more than $10, but that's for 3...so they come out to less than $10 each :) This seems ridiculous, but this thing makes my life SO much easier.  The charging cord that comes with the iPhone 1) falls apart too quickly and 2) is not nearly long enough!  My phone is almost always on super low battery, and these 10 foot cords mean that I can have it plugged in AND still comfortably use it sitting on the couch or laying in bed.  I think the braided cord is a lot more durable, too.  I have one of these in almost every room of the house!


OPI Passion nail polish

OPI Nail Polish, Passion, 0.5 fl. oz.

OPI "Passion" is my go-to color right now - it goes on super sheer, so you can't tell how bad I am at painting my own nails or how chipped they are from constant dish and bottle washing.  I feel more like a human when my nails are painted (and I pick at them less), so I slap on a coat or 2 of this once a week and feel much more polished (pun intended).


Ozark Trail (aka fake Yeti) Cup

Ozark Trail 20-Ounce Double-Wall, Vacuum-Sealed Tumbler

I have a real Yeti cup and this Walmart knock-off brand is IDENTICAL - in size and how effective it is at keeping drinks cold/hot.  I love all the color choices and mostly that it's LESS THAN $8.  This way, I can justify having several since I have a 3-year-old who likes to drink out of my cup, so it's almost always in the dishwasher (which I think is technically not recommended but, again, 8 dollars.)


Wednesday, August 23, 2017

Mom Hack: Clothesline + Sun = Ultimate Stain Remover

 Oh, laundry.  It NEVER ends.  Add to that the fact that both of my kids are/were MAJOR spitter-uppers, and the quantity of stained clothing/bibs/blankets/sheets/burp cloths is insane.  It wasn't so bad during the first 6 months when it's just milk spit-up, but ever since baby food and solids came into the picture (and even now, in the preschool years), we have had a ton of hard-to-beat stains.  I tried lots of Pinterest tricks - rubbing the stain directly with Tide or Dreft detergent, Oxiclean spray, soaking in hot water with Oxiclean powder, Dawn + hydrogen peroxide + baking soda, etc - and they worked fine on surface-level or fresh stains but couldn't get out the tough stains, particularly red and orange ones - carrot puree, ketchup, spaghetti sauce, and the like, or - the worst - baby poop stains!

Enter: the sun.  The sun gets out ALL kinds of stains, but especially the tough ones!  Anytime I have stained laundry, I do my standard Oxiclean-spray-and-launder; if the stain is still there after a wash cycle, I let the sun do its thing - I just set the (wet) item in direct sunlight, and the sun bleaches out the stain (while not affecting any colored fabric or graphics).  Initially, I laid the stained clothes on our patio dining table, but then (since those got the clothes dirty again from sitting on an outdoor table) I'd have to rewash them after the sun got rid of the stain.  Also, in the height of the baby food stain stage, I didn't have enough surface area on our table for all the stained clothes!  


I eventually invested in an inexpensive clothesline; it is retractable, so when it's not in use, it's unobtrusively hidden by a gutter downspout in our backyard (B's biggest hesitation with getting a clothesline was that it would be visible all the time).  


I also bought wood clothespins and this hanging clothespin bag, which hangs on the clothesline for easier access to pins while I'm hanging up or taking down laundry (instead of bending down to get them out of a basket on the ground).  


This has saved me SO much time and energy using different stain removal products, scrubbing stains with a toothbrush, and washing and re-washing - now, the stains are gone by the time the item dries in the sun!

Have you tried using the sun to get rid of tough stains?  Try it, you'll be amazed!

Monday, August 21, 2017

Toddler 101: Potty Training

Oh, potty training.  This was definitely the hardest parenting task to date, and by no means was it successful.  I am not writing this down as a "how-to", so much as a recap of our experience so I can remember for our next kiddo.


We tried the Lora Jensen 3-day potty training method when C was just shy of 2.5 years old.  This method basically involves cutting out diapers cold-turkey, putting your child in underwear 24/7 (including while sleeping) for 3 days, and constantly reminding them to let you know when they need to go potty.  Unlike some 3-day methods, you do NOT put them on the toilet every "X" minutes to "try". 

There were a LOT of accidents.  A lot.  Some of my friends (mostly with girls) said it "clicked" with their kiddos after the first day, and the number of accidents drastically decreased.  That was not our experience!  After 3 days, he did not have a single successful potty episode - every single #1 and #2 was an accident. 

It was so helpful to have done this while he was still sleeping in a crib, since the crib mattress is waterproof (no worries about soaking through to the mattress) and crib sheets are SO much easier to change than mattress pads, sheets, and bedding on a larger bed.

Some supplies that were critical for this endeavor:

  • Potty seat (we used The First Years seat)
  • At least 14 pairs of underwear (we were still doing laundry daily!)
  • Folex (or other carpet/rug cleaner)
  • Disinfecting spray, like Clorox Clean-up (for hard surfaces)
  • A pile of rags for cleaning up accidents
  • Old towels or disposable incontinence pads for every absorbent furniture surface (i.e., upholstered couch)
  • Oxiclean spray for #2 accidents
  • Plastic bags for containing soiled clothing in case of an accident in public - we used the Munchkin bag dispenser
  • Kandoo flushable wipes (toilet paper works but this works better IMO)
  • Juice or some other "enticing" drink to increase fluid intake
  • Waterproof liner for carseat (this one is approved for use with Britax carseats, which is what C uses)  *please do not use a liner unless it is made by your car seat manufacturer and approved for use with their carseats!  These are crash tested by the manufacturer to ensure they are safe and are only compatible with the car seats they are tested on!
  • Treats for rewards (we used mini M&Ms for #1 successes and mini Milky Ways for #2s)
We did at least one load of laundry daily consisting solely of underwear, rags, towels, and crib sheets.  After 3 days, we did see SOME improvement - although he was still having accidents frequently, he was staying dry for long periods during nap and at night (when normally he was a heavy wetter while sleeping). 

Unfortunately, starting on day 4, we had to return to work (and C to daycare) so it was into a pull-up he went.  The 3-day method discourages the use of pull-ups, but we didn't have much choice - he was nowhere CLOSE to being able to go to school in underwear.  At this time, he was the only child in his class working on potty training, so we weren't getting much help from school (there wasn't the "peer pressure" aspect since all the other kids were in diapers).  However, anytime he was at home, he was in underwear - including naptime.  We did make him "try" to use the bathroom before nap to minimize the chances of an accident in his crib.

Things slowly started clicking, and within 2 weeks, he was regularly telling us when he needed to go to the bathroom and having fewer accidents.  Luckily, around this same time, he switched to the older preschool classroom at school which was FULL of kids potty training - so he was encouraged to use the potty at school by all of his friends doing the same. It was a slow and steady process - and there were a lot of mini M&Ms and Milky Ways consumed - but he was fully daytime potty-trained in about a month.

After the initial 3-day method, we decided to hold off on overnight potty training - after several weeks, he was still having accidents every night and just wasn't ready.  Since he was moving into a big boy bed with baby #2 on the way, I couldn't handle changing sheets daily (they're so much harder to change than crib sheets!)  He turned 3 a month ago and still wears a pull-up at night, although he wakes up dry about 75% of the time now, so he is getting there on his own without any effort on our part.  

Friday, August 18, 2017

Friday Favorites: Costco Edition

It's Friday, which means I'll likely make a Costco run this weekend!  Like Trader Joe's, Costco is another place that I find overwhelming and need recommendations from friends in order to find new things to try!  With the bulk quantity, I am always hesitant to try new things because we'll be stuck with a ton of it if we hate it!  We just got a Costco membership about a month ago (the weekend before baby M was born!); here are some of our favorites.  What else do you love to buy there?

Image result for costco tortilla crusted tilapia

Tortilla Crusted Tilapia

My mom got me hooked on this; it is great to have on hand in the freezer for a quick dinner (it bakes in the oven in 10-15 minutes).  Even my 3 year old likes it!


Image result for costco tortilla soup
Chicken Tortilla Soup

I almost always have some of this on hand for a quick meal, too!  It comes in a twin pack, so we'll often eat one right away and freeze the other for later (it freezes really well!)  Add some avocado, grated cheese, and tortilla strips on top, and dinner is done!  Again, my toddler will eat this, so I consider that a win.

Image result for costco tomato basil soup
Tomato Basil Soup

Ditto to everything about the Chicken Tortilla Soup above - this is also delicious, freezes well, and makes a great dinner paired with grilled cheese.


Image result for costco chicken salad

Rotisserie Chicken Salad

This chicken salad is delicious!  My husband likes to buy it on Sunday and then take it in his lunch for work all week.  We always sort through all the containers to find the smallest one, though, because it is a huge quantity of chicken salad!


Image result for blue moose boulder fig

Blue Moose of Boulder Fig Spread

They were giving out samples of this fig spread last week, and of course it was delicious and I had to impulse buy it.  It is cream-cheese based and delicious on crackers as an appetizer.  We didn't need a huge tub of it tempting us in the freezer, so I froze most of it in smaller portions -- hopefully it thaws well!

Image result for costco multigrain crackers
Multigrain Crackers

These are the crackers that were being served with the fig spread above, and they are SO good - either by themselves or with a dip of some kind!


Image result for costco nature's garden snack packs

Nature's Garden Trail Mix Snack Packs

My toddler loves "trail mix", and so far I have managed to hide from him the fact that some of them contain things like M&Ms ad chocolate chips.  I like these because they are individually packaged (easy for the diaper bag!) and contain only dried fruit and nuts - no added salt or chocolate.


Image result for costco margarita mix
Ready-to-Drink Margaritas

This is one of those things that I would never have tried if my mom hadn't introduced me to it!  Call it tacky, but these ready-to-drink margaritas are delicious!  Chill the bottle and, if you're classy like me, drink over crushed ice.  

Wednesday, August 16, 2017

Toddler 101: Learning the Alphabet


Note: this is not a sponsored post - I borrowed this DVD from the public library and was not compensated in any way :)

At around 2.5 years old, C had long known the alphabet song and had started expressing interest in identifying letters ("what letter is that?"); however, he had NO patience to sit still while I tried to draw letters and teach him their names.  At first I chalked it up to him not really being ready, but he continued to ask me what letters were on signs, book covers, and labels.  

Somehow I came across the Leapfrog Letter Factory DVD while browsing Amazon one day and started reading reviews; there were SO many positive reviews that claimed their toddlers had learned to identify all the letters of the alphabet, as well as their sounds, purely from watching the DVD.  We are SUPER strict about C's screen time (exception: on airplanes, anything goes) - most weeks he he has absolutely no TV or iPad time, but we occasionally let him watch an episode of Daniel Tiger or Bubble Guppies (like when he gets his hair cut).  I wasn't a huge fan of the idea of him "learning" from a DVD, but I discovered our public library had a copy of the DVD and figured it was worth checking it out from the library for free.

The storyline of the movie is cute - the "letter factory" is where letters go to learn their sounds, and in the factory there is a room for each letter of the alphabet where the letters learn what to say ("the A says 'aaaah').  C LOVED the DVD - he laughs hysterically in the "I" room when the "icky" pen explodes.  As soon as it's over, he begs to watch it again.  As suggested by many of the Amazon reviews, we did let him watch the 30-minute DVD repeatedly for 1-2 weeks - I'm talking 4-5 times a week, which is WAY more screen time than he has ever had before, but I wanted to see if the content of the DVD would sink in (this is also when we painted the walls in his big boy room, so it was a great 30-minute distraction that I didn't feel totally guilty about). 

I was SHOCKED at how quickly he picked up on the material; after a couple of weeks of frequent watching, he could identify all of the (uppercase) letters of the alphabet by sight and also knew their "sound".  It has now been several weeks since he's watched the DVD, and he seems to have retained the material - he can still name all their letters and their sounds, and is so proud of himself when he can tell us the letters in a book title.  This DVD was a much faster (and for him, more enjoyable) way to learn the alphabet than me trying to teach it to him.  I initially checked it out (and renewed several times) from the library, but since it has been so effective and is only $7 on Amazon, I think it is worth the investment!

The one limitation with the DVD (if you can have complaints about a 2.5 year old knowing the alphabet and corresponding sounds) is that it focuses on uppercase letters only, so he still cannot recognize any of the lowercase letters which look different from their uppercase counterparts (b, d, e, g, h, q, r, etc.)  

Now that he is so comfortable with uppercase letters, I bought some Crayola ABC flashcards at Dollar Tree which have both the uppercase and lowercase letter on one side, and a picture starting with that letter on the opposite side.  (I couldn't find them new on Amazon, but here's what they look like -- and it appears they're available through some Amazon third party sellers if you can't find them at your local Dollar Tree.)  I punched a hole in the top corner of each card, mixed up the order, and put them on a binder ring so we can keep track of them and flip through them to practice letters.  Since he already knows the uppercase letters, he is much more eager about doing the flash card approach than he was pre-Letter Factory.  With them contained on the binder ring, they are easy to stash in my purse to occupy C while we wait at the doctor or at a restaurant.

All kids learn in different ways and at different stages/ages, but this has worked really well for us!
09 10