Showing posts with label Home Improvement. Show all posts

Monday, February 5, 2018

DIY: Painted Brick Fireplace


I have wanted to paint our brick fireplace since we first bought this house 6+ years ago; however, the brown brick looked OK with the then-tan wall color, and we were SO sick of painting...so it fell on the back burner.  We just had the living areas repainted a light gray, and as soon as the painters left, I knew the brown brick had to go.  It was finally time for a white-painted brick fireplace!

B wanted to have the painters come back to handle it, but I read a few articles online and thought we could DIY (plus, immediate gratification instead of waiting on an opening in the painters' schedule).  If you're thinking of painting your brick fireplace, DO IT!  It's both inexpensive and straightforward but makes a big difference in the whole room's look.  Here's what we did:

Supplies:
1 wire scrub brush (we used one similar to this)
Vacuum cleaner with upholstery attachment (we used our Dirt Devil Scorpion)
1 spray bottle
1 plastic scrub brush (we used one similar to this)
2-3 cups vinegar
1 tube paintable caulk (we used this kind in a squeeze tube since we don't have a caulk gun)
Painter's tape (we used Frog Tape)
Plastic drop cloths
2 paint trays
2 angled paint brushes (we tried several; this one worked the best)
1 gallon masonry primer (we used Zinsser 123 primer)
1 gallon interior latex paint (we used Benjamin Moore Simply White in semi-gloss finish)


Step 1: Scrub

We used a wire scrub brush to scrub away at the brick, paying particular attention to the area right around the firebox that had soot buildup from the previous owner, who used wood in the fireplace (we have since switched it over to gas logs).  The goal here is to loosen any debris or dust on the face of the brick, as well as in the mortar lines.


Step 2: Vacuum

We used an upholstery attachment on a handheld vacuum to brush and clean the brick surface.  The upholstery attachment helps brush out any dust or debris that might be stuck in the mortar lines.


Step 3: Clean

Several articles I read recommended TSP, but I didn't want to use anything that harsh with an infant in the house.  We used undiluted white vinegar in a spray bottle, saturating a small area of the brick at a time and scrubbing it with a scrub brush.  This should further remove any remaining dust or buildup on the brick surface, prepping it for better paint adhesion.  We allowed the brick to fully dry overnight.


Step 4: Prep

We applied Frog Tape to protect the trim and the wood floor around the brick, and covered the floor, firebox, mantle, and nearby furniture with a plastic dropcloth to protect it from paint roller overspray.


Step 5: Caulk

We caulked any visible cracks, both on the surface of bricks themselves, as well as in the mortar lines.  Since we were painting the brick white, I knew cracks would show up black against hte white paint and be even more noticeable.  The caulk directions said to allow it to dry for 2-6 hours, but we let it dry overnight to be extra safe.  After caulking, we re-vacuumed the hearth to pick up any bits of dried caulk that may have fallen.


Step 6: Prime

We primed the brick using a primer made for masonry, first rolling on primer using a thick-nap paint roller, and then using an angled paint brush to apply primer to the deeper mortar lines and edges that the paint roller was unable to reach.  We allowed the primer to dry overnight.  We used gray primer, which was a MISTAKE under white paint - it took 3 coats of white paint to cover all the gray.  Learn from our mistake and use white primer!


Step 7: Paint!

Finally! We used the same method to paint the brick as the primer - first, a thick-nap paint roller, followed by an angled paint brush on the mortar and edges.  We used Behr semi-gloss paint, color matched to Benjamin Moore Simply White.  It took 3 coats to cover the gray primer; if we had used white primer, we probably could have gotten away with only 1 coat - 2 at the most.  Remove the Frog Tape while the paint is still wet to avoid pulling off paint.


Step 8: Touch Up

After painting the brick white, the seam between the mantle and the fireplace, as well as the fireplace and the side trim, was noticeable - the gap looked like a black line between the white brick and the white mantle/trim.  We used the same white caulk to caulk in between the mantle and the brick, and the brick and the trim. It looks seamless now!  We also used a small craft paintbrush to touch up any spots we had missed with the white paint.


I LOVE the result!  Our whole living room feels brighter with the white brick fireplace instead of the dull brown brick!  I also love how much decorations "pop" against the white - our Halloween decorations show up so much better than they used to!

Wednesday, August 30, 2017

DIY: Pottery Barn Patio Furniture Refresh


I'd been wanting a couch or sectional for our back patio for a while now; our toddler loves spending time in the back yard, so we spend tons of time out there with him.  We have a dining table and a couple of wicker chairs on the patio, but a couch seems so much more comfortable!  I started shopping around online and realized that patio furniture is NOT cheap - especially couches and sectionals since the cushions really add up in addition to the cost of the furniture itself!  On the low end, IKEA outdoor couches and sectionals start at $400-500, and more mid-priced options are well over $1,000-1,500.

Enter a secondhand sectional!  I LOVE Facebook garage sale/resale pages - the one in our neighborhood is especially active and great deals can be scored on there all the time!  I like that our page is local (meaning we won't have to drive too far to pick up), and it feels less shady than buying off Craigslist (since you have to know someone personally to get into the group and I can check out our mutual friends before buying).  

One of my friends from the neighborhood bunco group posted her Pottery Barn Chatham sectional for only $50 - it was in good shape but they're changing their patio setup to accommodate a dining table and needed it gone!  It's still sold at Pottery Barn - for the configuration she was selling (including coffee table and cushions), it costs a whopping $2,381 new (plus over $500 in shipping and taxes).  Although it needed some TLC, I was willing to risk $50 on a $3,000 outdoor sectional!  


The cushions were a natural "canvas" color but had some mildew/mold from being left outside in the elements all winter.  The sectional and coffee table themselves are wood (mahogany) but had some slight fading from the sun (the coffee table worse than the sectional).  Overall, though, the cushions were still firm, there were no holes or rips in the fabric, and the wood was very sturdy.  My father-in-law came over last weekend with his pickup truck to help us pick it up, and then we went to town giving it a little refresh!

Luckily, the cushion covers zip off!  I ran them through the washer with a hefty dose of Oxiclean, which got rid of many of the stains.  For the tougher mold/mildew stains, I tried Oxiclean spray, soaking in Oxiclean and hot water, and borax, which all helped some but didn't do the job completely.  Finally (I wish I had started here), I mixed up a solution of 1 part bleach to 8 parts water in a spray bottle.  The fabric care instructions say not to use non-chlorine bleach, but I tested the colorfastness on a hidden part of the fabric and it didn't change the color, so I decided to go ahead.  

The bleach spray worked great and got rid of EVERY trace of mold or mildew that was on the covers!  They look brand new!  I was thrilled with this since new cushions alone run over $500 (before shipping or tax!)  Since the inserts were in good shape, once the covers were clean, they were good to go!  We plan to bring them inside (or store in a deck box) when not in use to keep them from getting so mildew-y again, since I am not sure what the effects of continued bleaching might be (plus they are a hassle to zip on and off).

As for the sectional and coffee table wood, the stain was still in pretty good shape, but there was some sun bleaching and the wood was looking a little dry.  Since the Pottery Barn website says they are made from mahogany and the wood wasn't heavily varnished, we refreshed the wood using this teak oil.  We applied a couple of coats using rags (my husband's old hole-y undershirts).  It took less than an hour for the two of us to do the entire sectional plus the coffee table.  The sectional looks SO much better!  The coffee table was in worse shape so it looks better but still not perfect (it probably needs to be sanded and restained but we didn't want to hassle with trying to match the stain on the sectional right now).  We let the wood dry outside for a couple of days before putting the cushions back on.

Overall, we are thrilled with how it turned out - especially considering it was only a $60 investment ($50 for the furniture and $10 for the teak oil).

Monday, August 28, 2017

DIY: Pottery Barn Kids Harper Look-alike Curtains


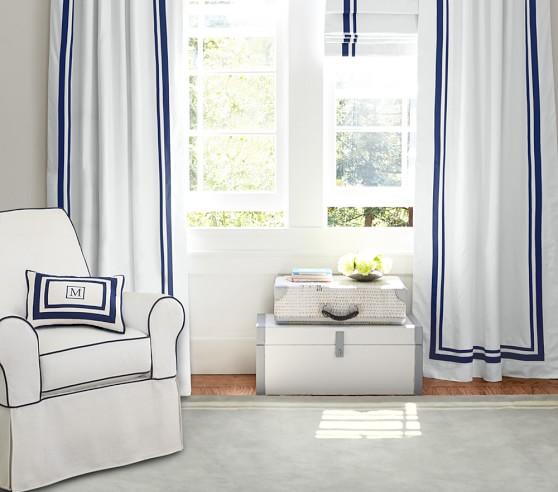
I am in love with Pottery Barn Kids stuff for baby and toddler rooms, but sometimes the price tag is just too much to swallow!  When I started planning C's "big boy" room, I loved the look of the PBK Harper curtain panels, but (for the 96" length I wanted), they are $79 (+ tax and shipping) EACH!  

Image result for pottery barn kids harper curtains


As much as I love them, I could not justify almost $200 on curtain panels for my toddler's room!  Like I did a with the rugby striped curtains in the nursery, I decided to try to DIY a less expensive version with a similar look.  

Supply list:


I bought a pair of 98" white RITVA curtains from Ikea for $24.99 (for the pair! I just tossed the included curtain tie-backs since I wanted the panels to hang straight.)  To be fair, these are not true blackout curtains like the PBK ones are, but we have plantation shutters that block out plenty of light, so blackout curtains weren't necessary for us.  
Image result for ikea ritva curtains

I wanted a similar look to the navy and white Harper curtains, so I bought navy grosgrain ribbon in both 5/8" and 2.25" widths on Walmart.com.  I got a 10-yard spool of the 2.25" ribbon and 3 5-yard spools of the 5/8" ribbon, which cost a total of $14.53.

Since the curtains are 100% cotton and say they have approximately 4% shrinkage, I washed and dried the curtains before starting to make sure that I didn't encounter any unwanted shrinkage or bunching in the final product.  And, since they are 100% cotton....they came out a wrinkled mess!  I spent FOREVER ironing them (with steam! and starch!) to get them flat again.  

After ironing, I hung the curtains up on the curtain rod in C's room to see how much excess length there was.  Since we have 96" ceilings and the curtain rod is a few inches from the ceiling, the 98" length was slightly too long.  I used straight pins to pin the curtains to the desired length (just skimming the floor).  Make sure to do both panels since they may have shunk to slightly different lengths!

After pinning up the excess, I used iron-on hem tape to hem each panel.  This would also be easy to do on a sewing machine, but I already had hem tape on hand, and I didn't want to get my sewing machine out and set it up just to sew 2 straight hems.

Inline image 2

I laid each curtain panel flat on our living room floor to glue on the grosgrain ribbon using permanent fabric glue (make sure it is washable!)  

Inline image 3
Starting with the 2.25" ribbon, I used a small amount of hot glue to glue down the end at the top of the curtain panel (folding under the edge of the ribbon to keep it from fraying), then used the fabric glue to adhere the rest of the ribbon (since hot glue will probably come undone if the curtains are washed and dried, I didn't want to do the whole panel using hot glue).  I used a piece of cardboard as a template to make sure that I was keeping the ribbon straight and an even distance from the edge of the curtain panel.  I also used a large piece of cardboard under the curtain panel to prevent any fabric glue from soaking all the way through onto our hardwood floors.  

I applied fabric glue to the underside of about 2 feet of the ribbon at a time, then pressed it onto the curtain using my hand, before moving on to the next 2-foot section of ribbon. When I got to the corners, I again folded the ribbon (I did not cut it) to form a corner and used hot glue to secure it, since it held better (i.e., more immediately) than the fabric glue.


When I finished gluing the 2.25" ribbon all the way around each panel, I then glued down the 5/8" ribbon, again using a cardboard template to make sure I was keeping it an even distance from the 2.25" ribbon in a straight line.

I am so happy with the finished product!  It achieved the look I was going for at a fraction of the cost of the PBK version.  My total cost was less than $50 for 2 curtain panels (approx. $30 curtain panels + $15 ribbon + $5 fabric glue, since I already had the iron-on hem tape).

Monday, May 1, 2017

Ring Video Doorbell Pro Review

Note: this is not a sponsored post - we purchased the Ring Pro Video Doorbell ourselves and were not compensated in any way :)


Over the past several months, I'd started noticing that more and more of our neighbors had upgraded their doorbells to Ring video doorbells.  Posts about stolen packages and suspicious solicitors on our neighborhood Next Door app had also started including video footage, rather than just descriptions.  Although we have an alarm system, we didn't have any security cameras and decided that since we both work during the day, it might be nice to have additional video security.  

My parents gifted us a Ring doorbell for Christmas this year, but unfortunately, our front door features window sidelights and there is only a narrow strip of wood where our existing doorbell was installed.  The Ring was too wide for the wood, and although the Ring can run on battery power (rather than being hard-wired where the existing doorbell is located), we didn't want to commit to recharging or replacing doorbell batteries regularly and decided to return it.  

Luckily, a couple of months later, Ring released the Ring Pro doorbell, which (among other upgrades) is narrower than the original Ring doorbell at less than 2 inches wide!  It also features higher resolution video footage (1080p vs 720p on the original Ring), interchangeable face plates to match your wall color/preferences, and customized alert zones.  Since we live a few houses down from the elementary school, the sidewalk in front of our house gets heavy foot traffic in the mornings and afternoons with parents walking their kids to and from school; the customized alert zone feature is handy because we can exclude being notified about motion on the sidewalk, instead limiting our alerts to motion on our actual property (yard + front walkway).  These features, and the narrower profile, were well worth the additional $50(ish) price tag of the Ring Pro over the original Ring model.

The Ring Pro can only be hardwired to the existing doorbell wiring (unlike the original Ring, which has the option to run off battery power), but we prefer the hardwired setup so we don't have to worry about recharging the battery.  It was super quick to install - maybe 10-15 minutes to connect the wires and screw it into the wall.  It has a 160-degree range of view, so we are able to capture activity on our entire front porch and a large part of our front yard.  It uses our home's wifi to alert us and record a video anytime there is motion detected or someone rings the doorbell.

Displaying IMG_0035.PNG

Anytime there is motion detected in the defined alert zone, the Ring Pro notifies us on our iPhones and begins recording a video (it also works on Androids and Windows smartphones).  We can access the video straight from the notification or go back and view (or rewatch) it later (e.g., middle of the night motion alerts or alerts that pop up when it's not convenient to access our phones).  

Displaying IMG_0038.PNG

The videos are good quality, include sound, and are generally about 30 seconds long (from the beginning of the detected motion until the motion ends, which is usually about 30 seconds for someone crossing our yard or approaching our front door).  We now know exactly when our mail or packages are delivered each day!  The videos are stored via Ring's cloud technology, which is free for the first 30 days and then $30 per year (so only $2.50 per month).  There is also a "live view" option, which allows you to see a live view from the Ring at any time (whether or not motion has been detected).  

The Ring Pro also has doorbell functionality and rings our existing doorbell in the house, as well as alerting us on our iPhones that someone has rung the doorbell.  From our iPhones, we have the capability to "answer" the doorbell by seeing a live view of the person on our porch and speaking through the Ring directly to them.  This allows us to answer the doorbell whether we are in our house (and just don't want to open the front door / get out off the couch) or away from home.  So few people ring our doorbell (other than the UPS delivery guy!) that this hasn't been a major feature for us yet.  I'm sure it varies depending on the speed of your wifi internet connection, but our doorbell and video appears to be on less than a one-second delay from real-time.  

We've only had it installed for a couple of weeks, but so far we are loving the additional security of knowing who is entering our yard or approaching our house and when packages are delivered.  I hope we never have a theft or other incident that requires using the Ring's videos for anything further, but it is nice knowing that option is available should we need to use it.  After my non-stop demonstration of the motion notifications at work, several of my co-workers are ordering one too!  The original Ring runs just under $200, while the Ring Pro is around $250 (often slightly less expensive on Amazon than purchasing from Ring directly).  

Wednesday, April 19, 2017

DIY (Affordable!) Backyard Mosquito Control

A Texas winter without a good freeze means two things: no snow days from work and terrible mosquitoes come summertime!  I don't know what it is, but our backyard is a mosquito haven.  I think it has something to do with the massive quantity of plants and trees relative to the size of our yard, but the mosquitoes get BAD!  Since it has been a fairly warm spring, they've already started to emerge.  

We routinely use bug spray when we're outside, but with me being pregnant (Zika!) and a toddler who spends tons of time outside (and reacts terribly to bug bites), we really need a way to eliminate the mosquitoes in our yard.  We've tried the tiki torches with citronella fuel in the past, and they didn't make a dent in our mosquito problem!  Last year we considered various options to control the mosquitoes - everything from paying a regular professional mosquito spraying service (which runs $150-200/month in our area) to having a mosquito misting system installed (starting around $1,500-2,000, plus $200-300/month in misting solution).  Given the sizeable price tags of these options, we decided to start with a cheaper DIY option to see how it worked - and luckily, it worked out great and we saved a bunch of money over the professional options.  

I've already stocked up on supplies for this year, and we did our first application last weekend.  Here's what we use:


1. Cutter Backyard Spray Concentrate
I think this spray makes the biggest overall difference in the number of mosquitoes in our yard - and luckily, it is easy to apply and super affordable.  The bottle of concentrated spray screws onto the end of a garden hose and you simply spray it around your yard - grass, plants, flower beds, even the patio surface.  We have a fairly small yard and one bottle is enough to do both our front and back yards.  Make sure to do it AFTER mowing the grass so maximize the effectiveness.  We do try to avoid spraying the plastic Little Tikes/Fisher Price toys in our yard (water table, picnic table, slide, etc.) to limit the direct contact our toddler has with the solution. 

It runs less than $9 per bottle and we re-apply every 2-3 weeks - every 3 weeks in spring/early fall; every 2 weeks in peak summer mosquito season.  We notice a HUGE difference once we pass the 3-week mark.  I just ordered 6 bottles on Amazon, which I expect should last us through most of this year's mosquito season.  $50-60 for the whole summer is much more affordable than the other options we considered!!

2.  Skeeter Screen Patio Egg Diffuser
We have 4 of these patio eggs around our back patio (where we spend the most time outside).  One of our favorite local restaurants has one of these on every single table on their outdoor patio!  Although these do not actually kill mosquitoes like the spray above, it does a good job of repelling them from the immediate surrounding area.  It comes with a ceramic egg-shaped diffuser, a hanging net, and a bottle of the diffuser oil.  You simply pour the designated amount of diffuser oil into the top of the egg (using the measuring cup provided) and it is slowly absorbed into the porous material of the egg.  The oil smells kind of like citronella - it doesn't bother us.  The bottom of the egg is coated with something to allow you to place it on furniture without the oil leaking through, but we use the (included) hanging net to hang the eggs from the eaves of our patio so they're out of reach of our toddler (both from a breaking-the-egg and a drinking-the-oil perspective).  When you stop smelling the oil, it's time to refill - in the heat of Texas summers, this is once every 2 weeks.  

We invested in the diffuser kits last summer, which run about $15-16 each, so this year we will just have to buy refill oil for our existing eggs.  The bottles of refill oil are 8 oz, which is twice the size of the bottle that comes in the kit, so they last a while (about 10 individual egg refills).  For some reason both the patio eggs and refill oil are hard to find locally (only a specialty garden store by my house sells it), so I tend to order on Amazon to save a special errand.  This was a $60-70 upfront investment for the 4 patio eggs last summer, and I expect that we'll spend $30-40 on refill oil this summer.

3.  Bug Spray
In addition to the preventative measures above, we also use bug spray when we're going to be outside.  I initially liked the OFF Family Care Smooth and Dry spray since it goes on dry and non-greasy (and smells good!), but then I had several bottles that clogged up after the first use and had to be thrown away - and bug spray isn't cheap!  It turns out the "dry" feature involves cornstarch, which frequently clogs up the whole container and renders it useless (I tried lots of methods to unclog it to no avail!)  Since then, I've switched to unscented OFF Family Care in the non-aerosol bottle, which goes on wet but is (mostly) unscented and the bottle doesn't clog!  It's only 7% DEET (compared to the 15% DEET in the Smooth and Dry format), so I use it when we're only going to be outside for an hour or so (drawing with chalk, playing with the water table, swinging).  I like the non-aerosol bottle for the diaper bag since it has a cap and won't accidentally spray the inside of your bag like the aerosol can will (speaking from experience!)

If we're going to be outside for an extended period of time (backyard dinner party, playing outside all afternoon), I use OFF Active (15% DEET), which goes on wet AND has the typical insect-repellent smell (which I'm not a fan of), but it is effective :)  We have tried lots of "natural"/essential-oil-based bug sprays and they are just not as effective as those with DEET (our pediatrician and the AAP agree).  Although DEET use is controversial, we make sure to always bathe and wash it off our skin before going to bed and avoid spraying it directly on hands that might end up in mouths!

For baby:
Since we're expecting a summer baby this year and bug sprays shouldn't be used on infants, we're relying on the preventative measures outlined above and mosquito netting to keep the baby bite-free.  We bought this stroller mosquito net a few years back and it has worked well on our BOB jogging stroller.

Monday, February 16, 2015

Home Improvement: Painting Baseboards over Carpet

When we decided to convert one of our extra guest bedrooms into a playroom for C (and his millionty baby toys), one of my first missions was to paint the wainscotting white.  When we bought this house 3 years ago, we painted the wainscotting the same color as the wall above it, even though we would have preferred it white -- but the (white) baseboards were quite yellowed due to the age of the oil-based paint, and we had no idea how to paint baseboards that were installed directly over carpet (nor the patience to research how to do it).  So, we left the white/yellowed baseboards and just painted the wainscotting gray.

I'd always regretted that paint decision, and once we got rid of the set of bedroom furniture that was in the room, it seemed like the perfect time to bite the bullet and paint the wainscotting and baseboards with a fresh coat of ultra-white oil-based paint.  Just had to solve that one dilemma - how to paint the baseboards without dripping paint all over our new(ish) carpet.  

When painting walls, I use tons of painters tape and have no problem, but I knew that painter's tape wouldn't be a tight enough seal to keep paint from leaking into carpet fibers.  A little Google research and YouTube watching later, I had a plan....which I executed while my husband was out of town so that he couldn't get anxious about me screwing it up and getting paint on the carpet.  Ha!


What you need:

A metal putty knife
A 2mm plastic drop-cloth
Frog Tape
Scissors


How you do it:

First, you'll need the drop cloth.  


While it's an option to drop cloth the entire room, I didn't want to do that since it's a fairly large room and it would have taken several drop cloths.  Instead, I used a drop cloth only around the perimeter of the room to catch any drips/spray from the paint (I used a combination of a smooth foam roller and a brush to paint the wainscotting).  I used a 9' x12' 2mm plastic dropcloth.  Don't cheap out here and get the 0.7 mm, which will get rips in it if you so much as breathe on it.  Spring the extra $0.50 on the 2 mm drop cloth which is considerably thicker and harder to rip holes in, therefore providing better protection of your carpet.  I cut my drop cloth into 4 strips that were each 2'(ish) x 12' (cut it while it is still folded up in order to cut straight lines...if you unfold the whole thing and try to cut it, good luck!)

After I had my drop cloth "strips", I laid it out parallel to the baseboards and used the putty knife to wedge about 1/2" of the plastic underneath the baseboard.  To do this, I placed the putty knife about 1/2" from the edge of the plastic closest to the baseboard, angled the putty knife about 45 degrees, and pressed firmly until the plastic "caught" under the baseboard.  


If you do it right, the plastic should be firmly stuck under the baseboard, protecting the carpet.  Move over 3-4 inches and repeat, making sure that the plastic is taught between the 2 places you tucked under the baseboard.  If any plastic is loose, go back and tuck it under with the putty knife.  


Continue working your way along the wall, until you run out of wall or drop cloth.  Add a new drop cloth strip, using the Frog Tape to tape the new piece to the prior piece (same with corners).  I also used Frog Tape to tape the opposite edge of the drop cloth (the side furthest from the wall) to the carpet so that it would lay flat and taut while I painted and not get bunched up.


After you complete the entire room, you're ready to paint!  I used an oil-based white paint and a brush to do the baseboards themselves, trying not to get too much excess paint on the drop cloth, but I certainly had a lot of drips.  The next day, after the paint was dry to the touch, I just tugged on the drop cloth to pull it out from under the baseboards.  There was not a single drop of paint on my carpet!  Success!

Tuesday, October 21, 2014

Home Improvement: Interior Door Replacement


Our home was built in the early 1970's, and, when we bought it, it had ugly mismatched interior doors and doorknobs.  Of the 13 interior doors in the house, 10 were the original, flat-panel interior doors.  Luckily, at some point in the past, a previous owner had the good sense to at least paint the wood color white, so they were slightly less hideous (although you could still clearly see the texture of the wood grain through the paint).  The remaining 3 doors were a newer, 6-panel style, which were fine except that they didn't match the rest of the doors.  The doorknobs weren't any better; they were a variety of styles and colors (all bronze or gold).  

Old doors + brass hardware + green carpet + baby blue paint...this house was a dream
Although we hated the interior doors, it wasn't a top priority for our renovation budget; as a temporary, inexpensive fix, we removed all of the doorknobs and spray painted them oil-rubbed bronze (we used this Rustoleum paint) so that at least they would match and be a more "current" color for door hardware.  This worked great -- for the 3 years that we lived with the old doors, the spray paint didn't chip or wear off at all.

The same room after replacing the carpet, painting the walls, and spray painting the doorknobs oil-rubbed bronze
3 years after moving into our home, after completing higher priority projects like gutting the kitchen and renovating the master bath, we finally decided to replace the interior doors.  Although this project wasn't one that we're likely to get our money back on upon resale, the dated appearance of the interior doors drove us crazy on a daily basis, so we opted to make the update for cosmetic purposes.  

I did a bunch of Googling to try to determine the best way to go about this project, as well as get a cost estimate, and didn't come up with much...so I hope this information helps someone else who might be considering replacing the interior doors in their home!

Ordering the Doors and Solid vs. Hollow-Core

We selected a Masonite Cheyenne 2-panel plank door; we priced them out at several different retailers and wholesalers and found that they were least expensive to order directly from a local plywood company.  We ordered 5 solid-core doors and 8 hollow-core doors; the solid-core doors are more soundproof but cost nearly three times as much as the hollow-core doors, so we opted to install solid-core doors only on the bedroom doors and the hallway door, to cut down on noise transmission while the kids are asleep.


Source
Door Installation

We wanted to replace the doors only (rather than the doors and the frames) to save on costs, since slab doors are less expensive than pre-hung doors.  Because our house is over 40 years old and has settled over the years due to the north Texas soil, many of the door frames were no longer completely square.  This meant that the door replacement wasn't a DIY job - we needed a professional who knew how to make the necessary adjustments to retrofit new doors into the existing door frames.  I contacted several handymen, but none of them wanted to take on a project this large or didn't know how to hang slab doors.  We got quotes from a couple of contractors we'd worked with in the past, but they were pricey because they wanted to install pre-hung doors.  Finally, we found someone local who specializes in door installation and was the right man for the job.

We ordered the slab doors unmortised and with no doorknob holes bored.  Our door installer mortised the hinges to match the placement of the hinges in the existing door frames and bored holes for the doorknobs to match the placement of the existing strike plates.  For the 5 solid-core doors, he also reinforced the door frame to accommodate the heavier weight of the solid-core doors (as the previous doors had all been hollow-core).  He did a great job; it took him 3.5 days to install the doors and reinforce the frames where necessary; in the end, he installed and adjusted all 13 doors to fit perfectly in the existing door frames.

Painting the Doors

Because the doors have a smooth finish (no faux wood grain like some doors have), we weren't brave enough to paint them ourselves, since we knew brush strokes would show every mistake.  The doors came pre-primed from the manufacturer; we hired a painter to paint the doors and the door frames (so that the color of the white paint would match).  We bought 3 gallons of Sherwin Williams ProClassic oil-based paint in Pure White.  The painter filled all the nail holes (where the door installer had to remove the trim to reinforce the door frames), caulked, and painted all 13 doors and frames over the course of 3 days.  The painted doors look great - we hadn't realized how yellowed the white paint on the old doors had become until we saw how bright and clean they looked with fresh paint.

Replacing the Doorknobs

We finished off the project by purchasing all new lever-style door handles in an oil-rubbed bronze finish.  We bought these at a local seconds/surplus store for much less than comparable styles at Home Depot or Lowes.

Project Cost

Interested in replacing your interior doors?  Here's the approximate cost:

8 hollow-core doors: varied between $29.95 and $35.24 each based on door width (bedroom doors are slightly wider than hallway, closet, and bathroom doors)
5 solid-core doors: $88.10 each
3 gallons oil-based paint: $46.89 each
13 lever-style door handles: $19.99 each
13 doors installation labor: base price $80 per door (extra for doors which had to be cut to size or frames reinforced)
3 days paint labor: $249/day

09 10