Showing posts with label Dinner. Show all posts

Wednesday, January 31, 2018

From the Kitchen: Pioneer Woman Baked Ziti

It is hard to go wrong with a Pioneer Woman recipe!  We had several friends over for dinner recently; since it was a Friday night, I needed something I could prep in advance since I didn't want my kitchen to be a disaster from trying to cook something on Friday after work.  This was perfect - I prepped it on Thursday night, refrigerated it overnight, and popped it in the oven when I got home from work on Friday.  My house smelled delicious but my kitchen stayed clean!  This recipe makes a TON (we had 6 adults and ate less than half of it!); I froze the other half (unbaked) and used it for a quick weeknight dinner a few weeks later.


Pioneer Woman Baked Ziti

Adapted from The Pioneer Woman
Servings: 12 (this recipe made a large Corningware casserole and an 8x8" Pyrex for me)

Ingredients:

1 16-oz box ziti pasta
1 lb ground Italian sausage
1 lb ground beef
3 cloves garlic, minced
1 large onion, diced
1 28-oz can whole tomatoes in juice
2 14.5-oz cans tomato sauce
2 teaspoons Italian seasoning
1/2 teaspoon red pepper flakes
1 15-oz container ricotta cheese
1 16-oz block mozzarella cheese, grated
1/2 cup grated Parmesan cheese
1 egg

Directions:

In a large pot of salted water, boil the ziti noodles according to package directions until just shy of al dente (otherwise they'll be mushy after baking the ziti).  Rinse it under cold water (I add ice cubes) to cool it down and stop the cooking process.  Set aside.

In a Dutch oven or large saucepan, saute the ground Italian sausage, ground beef, minced garlic, and diced onion until the meat is well browned.  Drain excess fat.  Add the canned whole tomatoes, tomato sauce, Italian seasoning, and red pepper flakes.  Salt and pepper to taste, stir well, and let simmer for 25-30 minutes.  Set aside 3-4 cups of sauce in a separate bowl to cool.

In a mixing bowl, stir together the ricotta, 2 cups of grated mozzarella, Parmesan cheese, and egg.  Add the cooled, cooked ziti and the cooled meat sauce that was previously set aside and stir to combine.

In a greased casserole (e.g., Corningware) or glass (e.g., Pyrex) dish, add half of the pasta mixture.  Top with half of the remaining sauce and half of the remaining grated mozzarella.  Repeat with another layer of the pasta mixture, the rest of the sauce, and the rest of the grated mozzarella.

Bake at 375 degrees approximately 20 minutes or until heated through and bubbling.  Allow to sit 5 minutes before serving.

Click here to see my other Pioneer Woman recipes!

Thursday, September 15, 2016

Hello Fresh Meal Delivery Review

Note: this review was not sponsored by Hello Fresh -- all opinions are my own.


When a friend of mine said she had 4 free boxes of Hello Fresh to give away to friends, I jumped on the chance!  I had been interested in trying a meal delivery service for a while, but hadn't bit the bullet - so a free box was just what I needed!

Hello Fresh is a meal delivery service that delivers a refrigerated box of ingredients to your home with everything you need to make 2-5 (based on the plan) meals! They offer a Classic Box, a Veggie Box, and a Family Box. You can choose from a 2-serving or a 4-serving size for the Classic and Veggie Box, and the Family Box serves 4 and has "child-friendly" meals.  The 2-serving Classic Box can be ordered in 3 ($69), 4 ($84.90), or 5 ($99) meals per week; the 4-serving Classic Box ($129), the 2-serving Veggie Box ($59), and the 4-serving Veggie Box ($109) are only available with 3 meals per week, and the Family Box can be ordered for 2 ($79.95) or 3 ($105) meals per week.   I opted for 3 meals of the Classic Box in the 2-serving size (regularly $69).


For the week I selected, there were 6 menu options, from which I chose 3: Chicken Gyro Salad with Tzatziki Dressing, Heirloom Tomatoes, and Cucumber; Steak Fajitas with Kiwi Salsa and Crispy Beans; and Pan-Seared Pork Chops with Shallot Thyme Pan Sauce, Peach Arugula Salad, and Couscous.


The box was scheduled to arrive between 8 AM and 8 PM on Monday, August 22.  At 9 PM on Monday, when my box still hadn't arrived, I called Hello Fresh customer service.  They showed that the box had been delivered at 4:52 PM, but I told them it had not.  They credited my account for a replacement box.  Then, on Tuesday, I got home from work and the box was on my porch.  Not sure what happened there, but I was frustrated that the box hadn't come the day it was supposed to, leaving me with a night without dinner planned!


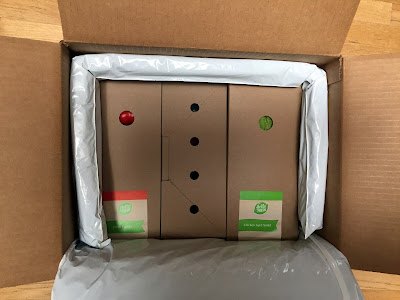
The box was well packed with insulating pads, 3 boxes with all of the ingredients (except meat) for each meal, 2 giant ice packs, and the meat separately packed on the bottom of the box so it wouldn't leak on everything else if it got punctured.  Given the mix-up with the delivery, I have no idea how long the food had been sitting on my porch, but the ice packs were still frozen and the food plenty cold.


I liked that the ingredients for each meal came in their own, labeled, cardboard box, so I didn't have to sort through the ingredients to figure out what went with each meal.  I did feel guilty, however, about all of the packaging waste -- I can't imagine creating this much waste on a weekly basis!  Luckily, one of my neighbors wanted the ice packs (for what, I have no idea), so at least I didn't have to throw those out, and most of the rest was recycleable.


My first meal was the Chicken Gyro Salad.  Here's what came in the box for this meal:


The instructions were super clear and well-ordered in order to maximize efficiency of the meal prep time -- getting the couscous on the stove and the chicken in the oven upfront, so that I could chop the veggies and make the tzatziki dressing while they cooked.  


The instructions said that it would take 30 minutes to cook, and I found that to be accurate - although that was a full 30 minutes of hands-on, non-stop cooking/prep time, not waiting around for something to finish baking.  This is definitely more "active" cooking time than I would normally spend on a weeknight meal, but the result was also a little more impressive.

We thought the meal was delicious -- the chicken was perfectly cooked, and it seemed pretty healthy.  The portion was large enough for my husband and I, along with our 2-year-old, to eat for dinner, which was a bonus.  Normally, if I spent this long cooking, I would make extra so we'd have leftovers for the following night, and that was not the case here -- the 3 of us ate the full serving.  (To be fair, it is only meant to be 2 servings -- it's just longer than I would normally spend for a single night worth of food).


The next meal was Steak Fajitas with Kiwi Salsa and Crispy Beans.  


This was also a winner!  I don't know what was in the Southwest Seasoning mix (a bummer for trying to recreate it), but this had a great flavor - and kiwi is not an ingredient I would ever have put in salsa!  This one did take me longer than 30 minutes due to all the chopping for the salsa.


Our third meal was Pan-Seared Pork Chops with Shallot Thyme Pan Sauce, Peach Arugula Salad, and Couscous:


This was our favorite of the 3 meals - everything about it was flavorful!  Pork chops were something I'd always steered away from because I didn't really know how to cook them without being dry and tough, so this was a good excuse to learn to cook something I'd been avoiding!


Although I loved the ease of the meal prep and the result, this is probably not something I would do on a regular basis.  Since 3 meals per week runs $60, this averages $20 per meal for 2 people -- for that, we could have gotten takeout, and certainly cooking at home with ingredients purchased at the grocery store would have been MUCH less expensive.  However, it was fun to try new recipes and not have to meal plan or grocery shop.  This would have been a great option for us pre-kids -- when we were both busy working professionals who had the disposable income for this kind of convenience.  I will probably recreate some of the recipes on my own in the future.  (As a bonus, they include the recipes for all 6 meals for the week - not just the 3 you select in your box - so you can try to recreate those recipes on your own as well!)  

Interested in trying Hello Fresh?  Use my referral code to receive $40 off your first box: 

222525HR2Y44


I'm curious to try other meal delivery services too - we're getting our first Blue Apron box next week, and Green Chef (which is all organic) the following week.  What's your favorite service?

Thursday, August 25, 2016

From the Kitchen: Southwestern Stuffed Bell Peppers

These are one of my go-to meals for friends with new babies, particularly if they ask for 'healthy' meals or are gluten-free.  They can be delivered unbaked and will last in the fridge for a couple of days until they are ready to bake and eat them!


Southwestern Stuffed Bell Peppers

Yield: 12 pepper halves (serves 6-10)


Ingredients:

6 bell peppers
1 lb ground beef or turkey
1/2 onion, chopped
2 cups cooked brown rice, cooled (I use Trader Joe's frozen brown rice because I hate cooking rice!)
1 can black beans, rinsed
1 can whole kernel corn
1 can diced tomatoes with green chilies OR fire-roasted tomatoes
1 1/2 cups shredded cheddar cheese, divided
1 Tbsp chili powder
1 Tbsp ground cumin
2 teaspoons garlic salt, divided


Directions:


Wash, remove stems, seeds, and membranes, and halve the bell peppers.   Bring a large pot of water to a boil.  Boil the bell pepper halves in batches (I can fit 6 at a time) for 3 minutes, then remove with tongs and drain in a colander.

In a large nonstick skillet, brown the ground beef or turkey and the chopped onion.  When the meat is nearly cooked through, add the chili powder, cumin, and 1 teaspoon garlic salt.  Drain the grease, then set aside to cool.

In a large mixing bowl, gently mix together the black beans, corn, brown rice (make sure it is cool!), diced or fire roasted tomatoes, 1 cup of cheddar cheese, and 1 teaspoon of garlic salt.  When the ground beef/turkey and onion is cool, add it to the bowl and mix it in.  

Spoon the filling into the bell pepper halves, mounding the tops.  Place the peppers in a greased Pyrex baking dish (I can fit 8 halves in a 9x13" Pyrex).  Sprinkle the remaining 1/2 cup cheddar cheese on top of the peppers (if desired).  Bake at 350 for 30-40 minutes, or until cheese is melted and the peppers are heated through.


Monday, March 23, 2015

From the Kitchen: Lasagna Soup

I love lasagna but hate the effort of layering all the pasta, sauce, and cheeses...which inevitably falls apart when I cut into the lasagna, anyway.  A recent snow day provided the perfect opportunity to try out this lasagna soup, which has all of the flavors of lasagna without the assembly effort!


Lasagna Soup

Adapted from Cooking Classy


Ingredients:

Soup:
1 lb ground beef or ground Italian sausage
1 small or 1/2 large onion, diced
3-5 cloves garlic, minced
4 cups chicken broth
1 28-ounce can crushed tomatoes
1 5.5 (or 6) ounce can tomato paste
1 3/4 teaspoons dried basil
3/4 teaspoon dried oregnao
1/2 teaspoon fennel seeds
1/2 teaspoon dried rosemary
1 teaspoon granulated sugar
1 1/2 tablespoons chopped fresh parsley
Salt and pepper
8 lasagna noodles, broken into bite-sized pieces (err on the small side!)

Topping:
1 1/4 cups shredded mozzarella cheese
1/2 cup grated parmesan cheese
8 ounces ricotta cheese
Chopped fresh parsley, to garnish

Directions:

In a large saucepan, brown the ground beef or Italian sausage with the diced onions and garlic.  Drain and discard the fat.  Add the chicken broth, crushed tomatoes, tomato paste, dried herbs, sugar, and fresh parsley.  Simmer for 20 minutes, then salt and pepper to taste.

In a separate pot, prepare the broken lasagna noodles according to the package instructions.  Reserve 1 cup of the cooking water prior to draining the pasta. 

Add the drained pasta and 1 cup of pasta cooking water to the rest of the soup.  

In a mixing bowl, stir together the mozzarella, parmesan, and ricotta cheeses.  

To serve, ladle the soup into a bowl; top with a large scoop of the cheese mixture, and garnish with fresh chopped parsley.  Serve immediately while still very hot so the cheese mixture will melt into the soup when stirred.

Wednesday, February 18, 2015

From the Kitchen: Crockpot Korean Pork Tacos

This fall/winter we've been using our Crockpot non-stop, especially on the days that I work and want to come home and play with my baby boy instead of cook dinner!  However, we get a little tired of the same old chicken dishes that seem to be Crockpot standbys.  This Korean pork recipe was delicious and different - it's definitely going into our rotation!


Crockpot Korean Pork Tacos

Adapted from Table for Two
Cook time: 8 hours


Ingredients:

1.5-2 lbs pork (I don't really think it matters what you use here - pork loin, pork tenderloin, boneless pork chops.  I used 2 boneless pork chops that were about 1.5 lbs.)
1 cups hoisin sauce (you can find this on the "international" aisle in your regular grocery store with the Asian ingredients)
3 cloves garlic, minced
3 teaspoons ground ginger
1 16-oz package broccoli slaw mix (in the refrigerated produce section, usually near the bagged salad)
3 Tablespoons rice wine vinegar
2 Tablespoons brown sugar
1 package flour tortillas
3 green onions, sliced thin


Directions:

Place your pork in the Crockpot (cut it into pieces if necessary to fit).  Add the hoisin sauce, garlic, and ginger, and thoroughly coat the pork with the sauce mixture.  Cover and cook on low for 8-9 hours.  When it's done, you should be able to easily shred the meat with 2 forks, like you would with pulled pork.  Mix the shredded meat with the sauce in the Crockpot.

Toss the broccoli slaw mix with the rice wine vinegar and brown sugar.  Serve the pork in tortillas along with the dressed slaw, and garnish with green onions.

Monday, December 15, 2014

From the Kitchen: Stacked Green Chicken Enchilada Casserole

This is a quick dinner that I made up on the fly to use up some leftover chicken and corn tortillas that we had sitting around...and we ended up loving it.  You could easily make this into normal enchiladas but I think it is much faster to make it into a stacked enchilada casserole - combining the technique of a lasagna with the ingredients of enchiladas!


Stacked Green Chicken Enchilada Casserole

Cook time: 30 minutes
Yield: 6 servings


Ingredients:

16 white corn tortillas
2 cups cooked, shredded chicken (I used leftover rotisserie chicken)
2 cans green enchilada sauce
1 cup grated Monterrey Jack cheese
1 10-ounce package prepared pico de gallo (I used Kroger's black bean and corn pico de gallo, found in the produce section near the bagged salad)


Directions:

Preheat your oven to 350 degrees.  Spray a 9"x9" Pyrex baking dish with cooking spray.

Place 4 corn tortillas in the bottom of the baking dish (they will overlap in the middle - that's OK).  Top the corn tortillas with 2/3 cup shredded chicken, 1/4 cup cheese, 1/4 cup pico de gallo, and 1/3 of a can of enchilada sauce.

Repeat another 2 times (making 3 layers total).  Top the 3rd layer with another 4 corn tortillas to form a "top" to the casserole.  Pour the 2nd can of green enchilada sauce over the top of the casserole.

Bake for 25 minutes.  Add another 1/4 cup of shredded cheese on the top and bake for another 5 minutes, or until the cheese is melted.

Monday, November 24, 2014

From the Kitchen: Crockpot Chicken Tortilla Soup

Since I've gone back to work, the crockpot has gotten a lot of use.  I can't bring myself to spend time in the kitchen cooking dinner when I get home from work when I'd rather be playing with Carter!  This chicken tortilla soup is one of our staples. If you want a thicker soup (more like a stew), omit the chicken broth.  For a thinner soup, add a 32-ounce carton of chicken broth.


Crockpot Chicken Tortilla Soup

Ingredients:

2 boneless, skinless chicken breasts
1 - 15 oz can crushed tomatoes
1 - 10 oz can of red enchilada sauce
1 - 4 oz can chopped green chilies
1 - 10-oz can diced tomatoes w/ green chilies
1/2 white onion, diced
½ zucchini, sliced
½ yellow squash, sliced
1 cup frozen or canned corn
2 cloves garlic, minced
1 teaspoon cumin
1 teaspoon chili powder
1/2 teaspoon salt
1/2 teaspoon pepper
Handful fresh cilantro, chopped
Optional: 1 – 32-oz carton chicken broth

Optional toppings:
Cilantro
Shredded cheese
Tortilla strips
Diced avocado
Sour cream

Directions:

      Put all ingredients (other than the toppings) into a large crockpot (mine is 7 quarts). Cook for 6 to 8 hours on low or 3-to 4 on high.  Remove the chicken breasts from the crockpot and shred with 2 forks; return to crock pot.  Serve, adding toppings as desired.

     If you want to make this ahead of time as a freezer meal, put all of the ingredients except the chicken broth in a zip-top freezer bag.  When ready to make, slightly thaw the bag enough to break the soup into large chunks.  Place in the crockpot, add chicken broth, and follow the cooking directions above.

Monday, November 3, 2014

Easy Giant Nachos

I don't know that you can call this a "recipe", but more of an "idea" when you need a quick and easy lunch or dinner that you can make with mostly stuff you already have sitting in your pantry or refrigerator.   It's especially great for kids or teenagers...or just two adults who like to eat like kids or teenagers :)   We love to make these for dinner while watching Aggie football on TV!  I usually have most of the ingredients on hand, and it's a great way to use up leftover refried beans, chicken, or steak (that's usually what prompts me to throw this into the dinner rotation!).


Easy Giant Nachos

Yield: it depends how many you make :) I usually make 2 or 3 per person
Cook Time: 8 minutes

Ingredients (quantities are variable based on how many you're making):

1 package tostada shells*
1 can refried beans (I use fat-free)
1 package grated cheddar cheese

Mix-and-match ingredients (based on what you prefer, or happen to have on hand):
1 jar diced jalapeno peppers
Grilled chicken breast or steak, chopped
Avocado, diced
Sour cream
Shredded iceburg lettuce
Tomato, diced
Salsa

*These come in 2 types of package in the grocery store - they're in the aisle with the taco shells and other Mexican ingredients.  I like the kind in the bag, when I can find it - I think they taste fresher.  Here's what to look for:
 

Directions:

Preheat the oven to 400 degrees.  Arrange the tostada shells on the cookie sheet so that they're not touching or overlapping.  Use a knife or angled spatula to spread a layer of refried beans on each tostada shell (this is the "glue" for the rest of the ingredients).  Top each nacho with chopped chicken/steak and diced jalapenos (if using).  Sprinkle grated cheese on top of the nachos (putting the cheese as the top layer helps to secure the toppings to the nacho!)

Bake in the oven for 8 minutes or until cheese is melted.  Remove the pan from the oven and top the nachos with whatever cold ingredients you've chosen - tomatoes, avocado, lettuce, sour cream, salsa, etc.  Serve while warm.  Enjoy!

09 10