Showing posts with label Nursery. Show all posts

Monday, September 4, 2017

DIY: Faux Chenille Baby Blanket Tutorial


I made one of these faux chenille blankets when I was pregnant with my son and used it as the backdrop for all his monthly baby pictures; despite the time-consuming process to make it, I wanted my daughter to have one of her own (#secondchildequality).  It's a good thing I'm not planning to have a ton of kids because I'm not sure how many more of these blankets I have in me, but I LOVE the end result and hope it is something my kids will keep forever.

Let me begin by saying I am VERY beginner-level at sewing.  I haven't sewn anything since my last pregnancy, so....nearly 3 years of complete inactivity.  This blanket really only requires the ability to sew in straight lines, so if you can do even the basics on a sewing machine, you can do this!


 Supplies:
  • 1.25 yards patterned fabric
  • 3 x 1.25 yards 100% cotton flannel (solid colors)
  • 2 x 250-yard spools thread that matches the patterned fabric (plus a 3rd spool of thread if your quilt binding is a different color)
  • 2 x 3-yard double-fold 0.875-inch-wide quilt binding
  • Fabric marking pencil
  • Yard stick
  • Safety pins
  • Straight pins
  • Slash cutting tool

First, fabric selection: you will have one patterned fabric that will be the "front" of the blanket, and then 3 colors of cotton flannel will be used to make the faux chenille texture.  The "front" patterned fabric can be whatever fabric content you want (mine happened to also be cotton), but the 3 colors of flannel MUST be 100% cotton in order for it to fray properly.  The flannel doesn't have to be solid colored, but any pattern on it is not really going to show up once you cut the chenille, so solid is usually easiest and cheapest. If you're going to spend money somewhere, spend it on the "front" patterned fabric and get cheaper solid flannel for the chenille.  My front fabric was $12.99/yard and the flannel was $2.99 yard, for reference.  The flannel colors you choose should coordinate (or contrast) with the "front" patterned fabric.  Similarly, the thread color should coordinate with the fabric (especially the "front" patterned fabric) so that it blends in and hides mistakes/wonky lines.  The quilt binding can either match or contrast your other fabrics, depending on your preference.

For this blanket, I used a pink-patterned floral fabric for my "front" patterned fabric, and 3 varying colors of pink flannel for the chenille.  I used pink thread and navy contrasting quilt binding (note: if you use contrasting, rather than matching, quilt binding, you will need a 3rd spool of thread in a color that matches the binding).  By using 1.25 yards of each fabric, you should end up with an (approximately) 45-inch square blanket.

The first step is prepping the fabric.  I do not wash mine in advance because I am brave/lazy like that and do not like trimming all the threads that come loose if you pre-wash.  You run some risk of shrinkage in the finished product this way, but I did it anyway.  Lay the "front" patterned fabric upside down (wrong-side facing up) on the ground.  On top of it, layer the 3 solid-color flannel fabrics.  The color on the very top (furthest from the "front" patterned fabric) is the color that will be most visible, so put your preferred fabric color on last.  Use scissors to trim any uneven edges if your fabric doesn't line up perfectly.


Use 10-12 safety pins to pin the 4 layers of fabric together, since the fabrics will shift some while you are sewing.  Since this is a project that will likely take several days to complete, I like to use safety pins instead of straight pins since they are more secure.  


Flip your pinned fabric over and use a yard stick to draw a straight line with a fabric marking pencil from one diagonal to the other.  This will be the first line you sew, and you will work your way outwards to the corner.


Finally - time to start actually sewing!  You will go through many, many bobbins of thread while making this project, so I like to thread at least 3-4 bobbins at a time to limit the number of times I have to stop sewing to rethread bobbins.  Make sure to sew with the "front" patterned fabric facing up, because the stitching on this side will be more visible than it will be on the back/chenille side, so you want to make sure you aren't bunching the fabric.  Start by sewing a straight line from one corner to the other on the pre-marked line.  This is the longest line you will have to sew, so they get shorter from here!  Backstitch at the beginning and end of each line to avoid unraveling once you start cutting the chenille.

After completing the first line, shift the fabric to the right so that the right edge of the presser foot is aligned with the line you just sewed.  I find it helpful to roll up the excess fabric to keep it from bunching too much against the machine.  Sew another line, keeping one-presser-foot distance from the first line.  


Keep doing this, sewing lots and lots (...and lots) of straight lines until you eventually reach the left-hand corner of the fabric.  When you reach the corner...you are halfway done!  Turn the blanket around (with the "front" patterned fabric still facing up, but moving the completed half to the right-hand side and the uncompleted half of the blanket on the left) and do the same thing for the other half of the blanket.  If you run out of thread in either the spool or the bobbin mid-line, don't worry - just reload, backstitch, and keep going.  There will be so many lines that it won't be noticeable in the finished product :)

Once you are done sewing lines, it's time to start cutting the chenille!  You will want a slash cutting tool for this part - trust me!  I can't even imagine cutting this many lines with scissors.  

Place the blanket on the ground or flat surface with the flannel side facing up.  You want to cut the 3 flannel layers in between each line WITHOUT cutting the "front" patterned fabric.  I find it easiest to use a small pair of scissors to snip the flannel between each sewed seam to "start" the cut - it makes it easier for the slash cutter to do the rest of the work without having to pull too hard.  

Then, stick the slash cutter under the 3 flannel layers (but on top of the patterned fabric) and push the tool, parallel to the ground, towards the other end of the blanket to cut through the flannel layers.  Cutting 3 layers of flannel at once, many, many times (between each pair of lines) will dull the slash cutter blade quickly, so when it starts becoming more difficult to push the tool to cut the fabric, make sure to rotate the blade to reveal a "fresh", sharp section of the blade (if you don't do this and use a dull blade, you will eventually use so much force to push the tool that you will rip out a seam).  You will also have to pick flannel lint out of the blade every few cuts to keep the blade from getting clogged up.


Once you have cut the flannel between all of the lines, use a yard stock to "square up" the edges of the blanket and trim off any excess fabric (since it likely shifted some during sewing), including the fabric selvage on the "front" patterned fabric.  Don't worry if trimming involves cutting off some of the backstitching on the lines you sewed - the quilt binding will ensure that the seams don't unravel.  


If you want your blanket to have rounded edges like mine, use a rounded object (I used a salad plate) to trace and then cut a rounded edge on each corner.  Trim off any remaining loose threads.


The last labor-intensive step - the quilt binding!  Use straight pins to pin the quilt binding around the outer edge of the blanket, making sure to sandwich all 4 fabric layers between the 2 sides of the quilt binding.  


If your binding is a contrasting color, make sure to rethread your sewing maching with an appropriate thread color to blend in (my beginner sewing skills make sewing on the quilt binding the hardest part of the whole process, so I like to hide my mistakes as much as possible with thread that blends in!)  Use your sewing machine to sew along the inner edge of the binding - as close as possible to the edge while still "catching" the binding on both sides of the blanket (I check the back side every few inches to make sure my seam isn't running off the binding).  This part is very slow and steady for me, and involves a lot of seam-ripping and re-doing, especially when going around the rounded corners (but again....beginner-level skills).  


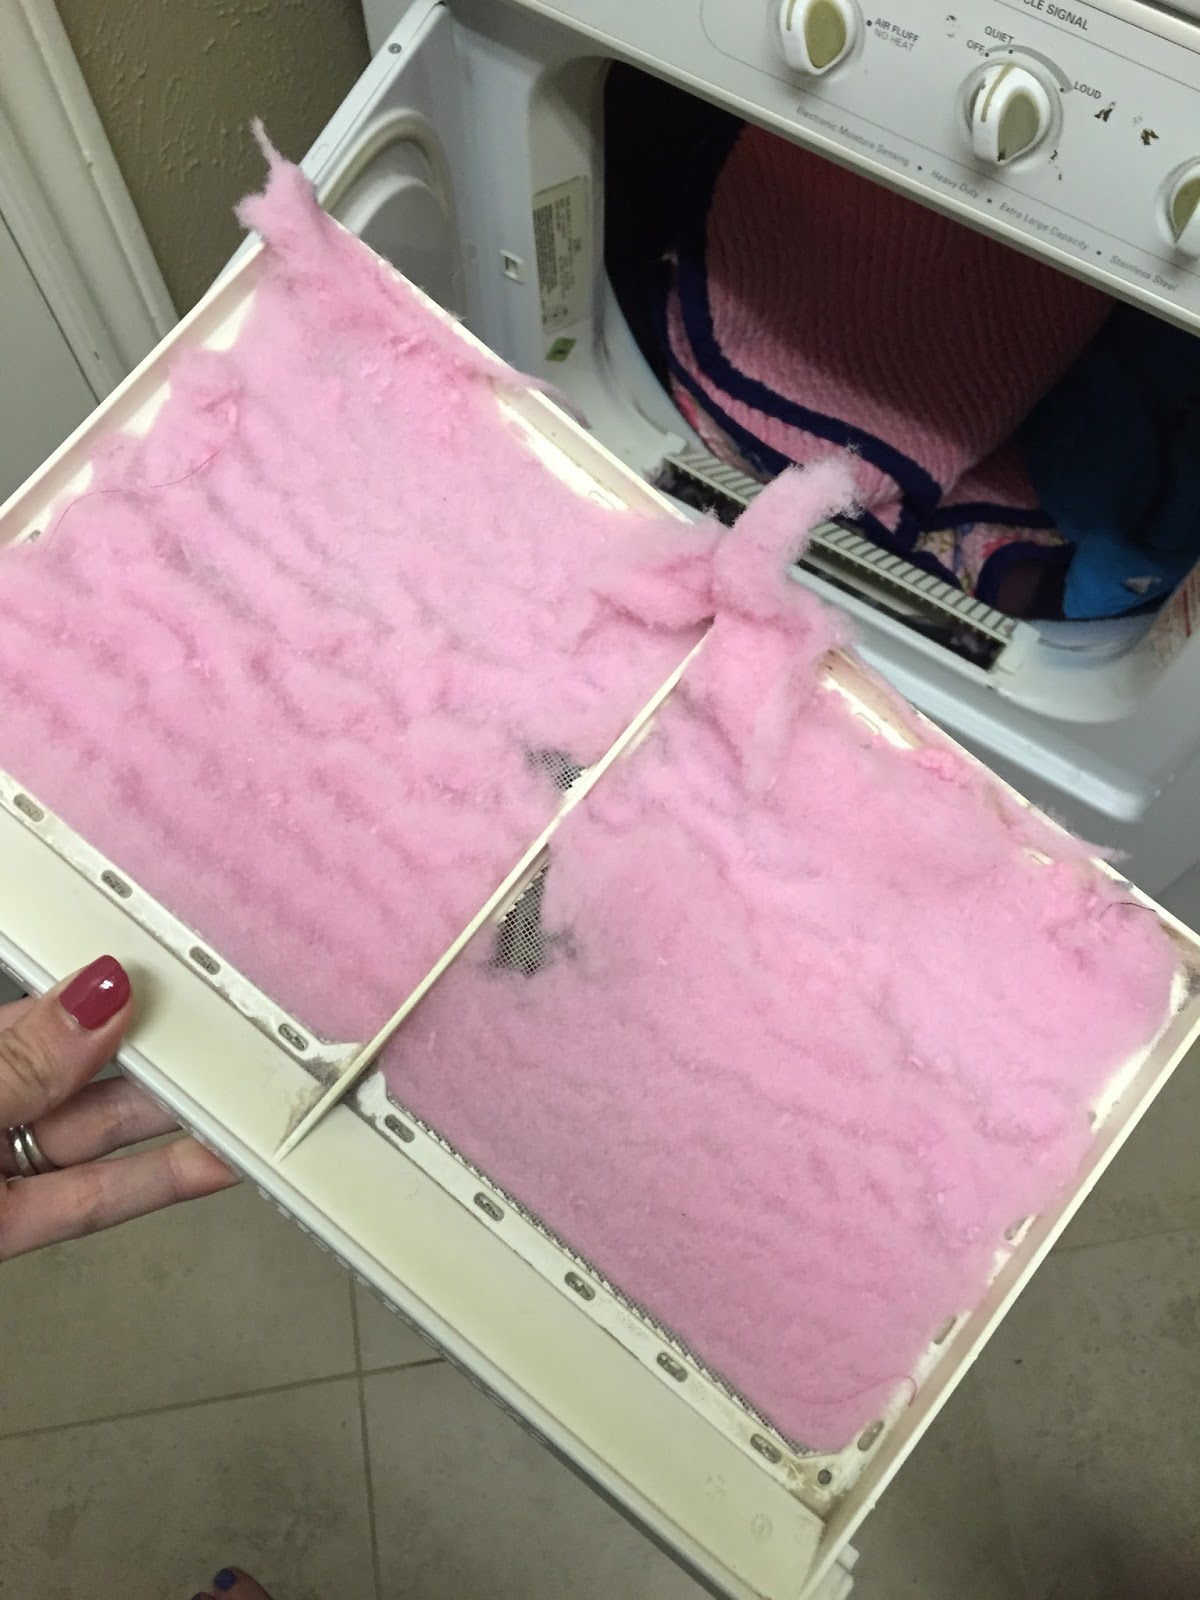
Once you're done, double check the binding to make sure that there aren't any gaps in the seam all the way around.  When you're satisfied that the edges of the blanket are fully encased in the quilt binding, it's time to wash!  Wash the blanket (a regular wash cycle on cold water should be fine).  Because I didn't pre-wash my fabric before sewing, I use a Shout Color Catcher sheet to soak up any dyes that might run during washing.  Make sure you wash the blanket BY ITSELF - the cut flannel will generate a huge amount of lint that you don't want sticking to other things in the same wash load!!  Machine dry the blanket on low or medium heat; if you remember, clean out the lint filter halfway through the drying time because IT WILL BE FULL.  Like, really full.


When the blanket is dry, admire all the flannel that has fluffed up into a soft chenille texture!  You did it!  It may be time- and labor-intensive, but the end product of seeing all those lines of chenille is worth it!


Monday, August 28, 2017

DIY: Pottery Barn Kids Harper Look-alike Curtains


I am in love with Pottery Barn Kids stuff for baby and toddler rooms, but sometimes the price tag is just too much to swallow!  When I started planning C's "big boy" room, I loved the look of the PBK Harper curtain panels, but (for the 96" length I wanted), they are $79 (+ tax and shipping) EACH!  

Image result for pottery barn kids harper curtains


As much as I love them, I could not justify almost $200 on curtain panels for my toddler's room!  Like I did a with the rugby striped curtains in the nursery, I decided to try to DIY a less expensive version with a similar look.  

Supply list:


I bought a pair of 98" white RITVA curtains from Ikea for $24.99 (for the pair! I just tossed the included curtain tie-backs since I wanted the panels to hang straight.)  To be fair, these are not true blackout curtains like the PBK ones are, but we have plantation shutters that block out plenty of light, so blackout curtains weren't necessary for us.  
Image result for ikea ritva curtains

I wanted a similar look to the navy and white Harper curtains, so I bought navy grosgrain ribbon in both 5/8" and 2.25" widths on Walmart.com.  I got a 10-yard spool of the 2.25" ribbon and 3 5-yard spools of the 5/8" ribbon, which cost a total of $14.53.

Since the curtains are 100% cotton and say they have approximately 4% shrinkage, I washed and dried the curtains before starting to make sure that I didn't encounter any unwanted shrinkage or bunching in the final product.  And, since they are 100% cotton....they came out a wrinkled mess!  I spent FOREVER ironing them (with steam! and starch!) to get them flat again.  

After ironing, I hung the curtains up on the curtain rod in C's room to see how much excess length there was.  Since we have 96" ceilings and the curtain rod is a few inches from the ceiling, the 98" length was slightly too long.  I used straight pins to pin the curtains to the desired length (just skimming the floor).  Make sure to do both panels since they may have shunk to slightly different lengths!

After pinning up the excess, I used iron-on hem tape to hem each panel.  This would also be easy to do on a sewing machine, but I already had hem tape on hand, and I didn't want to get my sewing machine out and set it up just to sew 2 straight hems.

Inline image 2

I laid each curtain panel flat on our living room floor to glue on the grosgrain ribbon using permanent fabric glue (make sure it is washable!)  

Inline image 3
Starting with the 2.25" ribbon, I used a small amount of hot glue to glue down the end at the top of the curtain panel (folding under the edge of the ribbon to keep it from fraying), then used the fabric glue to adhere the rest of the ribbon (since hot glue will probably come undone if the curtains are washed and dried, I didn't want to do the whole panel using hot glue).  I used a piece of cardboard as a template to make sure that I was keeping the ribbon straight and an even distance from the edge of the curtain panel.  I also used a large piece of cardboard under the curtain panel to prevent any fabric glue from soaking all the way through onto our hardwood floors.  

I applied fabric glue to the underside of about 2 feet of the ribbon at a time, then pressed it onto the curtain using my hand, before moving on to the next 2-foot section of ribbon. When I got to the corners, I again folded the ribbon (I did not cut it) to form a corner and used hot glue to secure it, since it held better (i.e., more immediately) than the fabric glue.


When I finished gluing the 2.25" ribbon all the way around each panel, I then glued down the 5/8" ribbon, again using a cardboard template to make sure I was keeping it an even distance from the 2.25" ribbon in a straight line.

I am so happy with the finished product!  It achieved the look I was going for at a fraction of the cost of the PBK version.  My total cost was less than $50 for 2 curtain panels (approx. $30 curtain panels + $15 ribbon + $5 fabric glue, since I already had the iron-on hem tape).

Monday, August 7, 2017

DIY: Framed Chicken Wire Hair Bow Holder


I originally had a round glass fishbowl on the changing table in the nursery that I intended to use for hair bow / headband storage....and then it quickly filled up, and I realized what a pain it was to dig around trying to find a specific color at the bottom.  I saw several cute chicken wire options on Etsy, but I didn't want to invest $40-50 in something to hold hair bows.  I looked up several DIY options, but they involved buying a whole roll of chicken wire (which doesn't come in small quantities) and attaching it to a frame yourself.  These DIY options were going to take longer and cost more than I really had the patience to invest :)  Enter pre-chicken-wired frames from Amazon Prime (read: no errands!) and, less than $15 and 30 minutes later, I had a hair bow holder!

I used the following supplies:


  • 8 x 10" framed chicken wire via Amazon (Note: 16 x 20" and 10 x 22" versions are also available if you have more wall space!)
  • 7/8" white vinyl cup hooks via Amazon
  • Spray paint (I used a random leftover can in my garage - it only takes a tiny bit!  You could also use acrylic paint and brush it on)
  • Ruler
  • Sharpie
  • Small tack nail
  • Hammer
  • Pliers
  • Ribbon (I used random leftovers I found in my gift wrapping bin)

First, paint (whether using acrylic or spray paint) the framed chicken wire and allow it to dry overnight.  Use a ruler to measure out where you want the cup hooks to go (mine are approximately 1" apart), and use the Sharpie to mark each spot with a small dot.  The 8 x 10" frame fit 9 cup hooks on the 8" side -- if you use a wider frame, you can probably squeeze in more hooks!


Use the hammer and tack nail to create a partial "starter" hole on each dot.  You don't need to hammer all the way through the frame - just enough for the cup hook screw to have a little hole to start in (and then pull out the nail).  You could also drill pilot holes with a drill, but B was out of town and I didn't want to deal with getting out the drill myself.


After creating the starter holes, I hand-screwed each of the cup hooks in most of the way.  When it got too hard to turn by hand, I used a pair of pliers to turn each cup hook the rest of the way.  


The framed chicken wire came with hanging hardware pre-installed on the back, so then I just added a ribbon to the existing hardware to hang it on the wall.  I am excited to have the chicken wire part for hairbows and the hooks for elastic headbands!

Wednesday, September 3, 2014

DIY: Nursery Alphabet Letter Wall

When I was pregnant, I saw alphabet letter walls all over Pinterest and knew I wanted to create one for my nursery!

The idea of searching hobby and craft stores all over town to find alphabet letters in a variety of sizes and fonts was daunting; luckily, an Etsy search revealed that I could buy the entire alphabet set at once, for basically the same cost as I would be able to buy 26 individual letters at Michael's, Hobby Lobby, or Joann.  I ended up ordering these because I liked the combination of sizes and fonts.


Interested in making an alphabet wall of your own?  Here's how:

Supplies:

1 set of wooden alphabet letters
3 cans of spray paint (I used 1 can of Valspar spray paint in Tropical Foliage and 2 cans of Rustoleum spray paint in white)
6-7 12x12 sheets scrapbook paper (I got the blue-and-white striped paper at Hobby Lobby)
1 pencil
1 pair scissors
1 bottle of Modge Podge
1 Foam paintbrush
Scrap cardboard


Sale- Alphabet Set -Unfinished Wooden Letter - Alphabet Wall- mixed fonts and sizes- ABC Wall- Gift- Baby Shower 
Source
 

Directions:


  1. Lay out your alphabet letters in order.  Starting with A, select every 3rd letter and set them aside.  These will be color 1.  Starting with B, select every 3rd letter and set them aside.  These will be color 2.  The remaining letters (starting with C) will be color 3.
  2. For each set of letters (color 1, 2, and 3), arrange the letters on pieces of scrap cardboard outdoors and spray paint them**.  I found that using cardboard worked better than a plastic dropcloth since it was totally flat and allowed me to completely paint the edges of the letters.  I painted color 1 green and colors 2 and 3 white.  (I wanted the scrapbook paper-covered letters to have white edges). 
  3. Allow the spray paint to cure in a covered, dry area (we put them in the garage) for at least 24 hours.
  4. Take the color 3 letters and use a pencil to trace each letter on the scrapbook paper.  Carefully cut out each letter using scissors.
  5. Use a foam paintbrush to apply a thin layer of Modge Podge to the back of each scrapbook paper letter cutout.  Carefully adhere the scrapbook paper cutout to the front of each wooden letter, making sure to smooth out any air bubbles.
  6. Use the foam paintbrush to apply a thin layer of Modge Podge to the front of each letter to seal the scrapbook paper and give it a hard and durable finish. 
  7. Allow the Modge Podge to dry overnight.
  8. Arrange your alphabet letters on the floor to determine the arrangement you want on the wall.  Hang them up and admire your hard work!  I used Command picture hanging strips to hang mine because I didn't want to put that many nail holes in the wall.  I used either 1 or 2 strips depending on the size of the letter (I think I used 4 packages, which each had 4 small strips and 8 medium strips).

**Safety first!  If you do this project while pregnant, like I did, make sure to have someone else do the spray painting for you so you don't breathe in the paint fumes!  We also allowed ours to cure in the garage for an extended period of time (3-4 days) so they didn't off-gas in our house.

Friday, August 29, 2014

DIY: Painted Horizontal Striped Curtains

 
Before we found out our baby's gender, I knew that I wanted wide horizontal striped navy and white curtains in the nursery.  However, after much online searching, I couldn't find what I wanted for less than $400.  So, I decided to gamble on some $30 Ikea curtains and try making them myself.  I was thrilled with how they turned out; while they're a little stiff to the touch, they look great (and why are you touching my curtains anyway?!)

These curtains use fabric medium and acrylic craft paint; don't skip the fabric medium, because it makes the paint less stiff and also makes it washable and permanent.  If you can't find the perfect color of acrylic paint, feel free to combine colors to create a custom color; I used a combination of dark blue and black paint to create the navy color I wanted. 

It took a couple of hours to measure and tape off the stripes, but the painting went pretty quick.  You should be able to finish all of the painting in one afternoon, and then complete the project by ironing and hemming the next day!

Supplies:

1 pair Merete curtains from Ikea in white
36 ounces (4 8-ounce and 2 2-ounce, or 18 2-ounce bottles) acrylic craft paint
3 6-ounce bottles Martha Stewart tintable fabric medium
1 roll Frog tape (this kind works best; the blue painter's tape allows more paint to seep through)
1 yard stick
1 pencil
1 small foam paint roller
1 paint tray
1 plastic drop cloth
1 roll iron-on adhesive hem tape
Iron
Ironing board

Directions:


  1. Spread the plastic drop cloth out on a flat surface, taping it to the floor using Frog tape so that it doesn't move. 
  2. Spread the Merete curtains on top of the drop cloth, making sure to smooth out any wrinkles.  (I didn't iron before I painted them, but you can if you want). Tape the edges and corners of the curtains to the drop cloth using Frog tape so that it doesn't move while painting.
  3. Measure the length that you want your curtains to be (from your curtain rod to the floor), since the Ikea curtains come un-hemmed.  Measure that length from the top of the curtains and use the yardstick and pencil to draw a line to mark the bottom of your curtains.  Allowing about 2 inches of extra fabric below your pencil line, cut off any excess material.
  4. Decide how wide you want your stripes to be.  Mine are 12 inch stripes, with a 3.5-inch white stripe at the top (to avoid having to paint around the grommets).  Measure 3.5 inches from the top of the curtains and use the yardstick and pencil to draw a line.  Then, measure 12 inches from that line and draw another line.  Continue down the length of the curtains.
  5. Use the pencil to draw several "X"s in the stripes that you plan to paint.  This will help you from getting confused while painting and accidentally painting a stripe that should be white.
  6. Place Frog tape along your pencil lines to outline your stripes.  Make sure that you place the Frog tape ABOVE the line marking the top of the painted stripe and BELOW the line marking the bottom of the painted stripe.  (If you put the Frog tape either in the same place for every line, your stripes won't be evenly spaced.
  7. Press down on all of the Frog tape to make sure it is securely adhered to the curtains.  If it's loose, paint will seep under the tape and mess up your straight lines!

  8. Mix the fabric medium and acrylic paint in a disposable container.  Follow the directions on the fabric medium; the Martha Stewart brand calls for 2 parts paint to 1 part fabric medium. 
  9. Pour the paint mixture into a plastic paint tray.  Using a smooth foam roller, paint the stripes you marked with an "X", making sure not to drip onto the white stripes.  Be generous with the paint -- it will take several coats, since the cotton curtains suck up a ton of paint.  If you don't use enough paint, the stripes won't be opaque when you hang them; they will have an uneven, watercolor effect.
  10. Let the paint dry for half an hour, then touch up any areas that appear lighter than others to make sure that the stripes are fully opaque.

  11. Allow the paint to dry for at least 12 hours before moving the curtains.  When dry, use an iron to heat set the curtains.  This sets the fabric medium and makes the paint permanent and washable.
  12. Fold the hem of the curtain on the pencil line marking the bottom of the curtain.  I did a double fold so that the hem would look more finished from the back (rather than having the uneven frayed edges where I cut off the excess material show).
  13. Cut a length of adhesive hem tape the same width as each curtain panel.  Place it in the fold between the curtain and the folded hem, and iron it.  Follow the directions on the brand of hem tape you buy to determine how long you need to iron the hem tape for it to secure.
  14. Hang your curtains and enjoy!

Thursday, August 28, 2014

Navy, Green, and Gray Nursery Tour


 Before we found out the gender of our baby, I had already decided on the design of the nursery: I wanted it to be primarily navy, gray, and white: specifically, white furniture, a gray upholstered glider, and navy-and-white horizontal striped curtains.  If the baby was a boy, we'd add bright green accents; for a girl, hot pink.  All of the big-ticket items would be gender-neutral, so if we have a daughter in the future, we'll just switch out the green accent items for pink ones and be able to re-use everything else.

The nursery has several DIY projects, either because I couldn't find the specific vision I had in my head for sale, or I could but it was outrageously expensive (horizontal striped curtains, I'm looking at you).  I made the alphabet letter wall, the horizontal striped curtains, and most of the gallery wall myself. 


Crib: Pottery Barn Kendall crib in white
Crib sheet: Pottery Barn Kids tile geo sheet in navy
Crib skirt: Pottery Barn Kids Harper Crib Skirt
Quilt: Pottery Barn Kids Alligator Madras Quilt
Frames: all purchased at Michaels and spray-painted white

Gallery wall art, clockwise from top left: Etsy, DIY, DIY, DIY, Etsy, DIY

Gallery wall art, clockwise from top left: DIY using fabric from Hobby Lobby, DIY, DIY using paint chips

Alphabet wall: DIY using unfinished wood letters purchased on Etsy from GalleryWoodLetters
Changing pad cover: Pottery Barn Kids chamois changing table pad cover in gray
Diaper caddy: Pottery Barn Kids navy geo reversible changing table storage

Dresser: Ikea Hemnes 8-drawer dresser in white


Curtains: DIY using Ikea Merete curtains in white
Curtain rod: Target Soft Square rod in nickel
Glider and ottoman: Little Castle Serenity glider from Buy Buy Baby
Pillow: purchased at Ross
Faux chenille blanket: DIY
White side table: Kraven white round accent table
Diaper pail: Ubbi diaper pail
Lamp: Target acrylic stacked ball lamp base (medium)
Shade: Target trellis print lamp shade (medium)
Rug: Bright Eyed Suzy Rug in green
09 10