Showing posts with label DIY. Show all posts

Monday, February 19, 2018

DIY: Two Fixes for a Motorola Video Baby Monitor that Stops Working

Video baby monitors have a remarkable tendency to break on you, which is a shame considering how expensive they are and how much parents rely on them!   We have a Motorola video baby monitor that we purchased in 2014, so it's well out of warranty.  It has worked great for the last 3.5 years and we added a second camera for baby M in 2017.  Our monitor is Motorola model MBP36BU (the model number is on the bottom of the camera), but the two fixes below should work for most Motorola video baby monitors (and maybe other brands as well. 

Fix #1 - Parent Console Stops Holding a Charge

About a year ago, the baby monitor stopped holding a charge.  It worked fine as long as it was plugged into the wall, but wouldn't hard a charge when running on battery power.  I'd charge it fully, unplug it to carry around with me while baby napped, and the battery would die way too fast - sometimes only 20-30 minutes from fully charged to completely dead.  Luckily, that is an easy and cheap (~$10) fix - you just need to replace the battery, which you can order inexpensively on Amazon.  This is the exact battery I ordered, which has held up well for over a year now.  Unscrew the battery cover on the back of the parent console, remove the old battery, and insert the new battery.  Problem solved!


Fix #2 - Parent Console Doesn't Recognize Charging Cable

I was NOT pleased when, this week, the parent console started not recognizing the charging cord being plugged in!  (The charge cord was plugged in, but the battery symbol in the top right corner didn't show that it was charging.)  This meant that, once the existing battery power was drained, the monitor couldn't be used either plugged in or running on battery power!  After talking to friends and reading online, I found that this is a common failure point - sometimes you can wiggle or prop the charging cord just right to get the monitor to recognize it, but it loses contact repeatedly, resulting in the baby monitor dying after the battery runs out.  

I am nothing if not stubborn, so I refused to resort straight to buying a new baby monitor!  Cue more research....apparently Motorola baby monitors in particular tend to have poor solder joints on the charge port; over time, repeatedly plugging and unplugging the charge cord over the years puts strain on and loosens these solder joints, eventually causing them to fail.  How long this takes varies depending on the quality of the original solder and the use of the baby monitor (how often the cord is plugged and unplugged from the parent console, etc.)  Apparently, at 3.5 years of daily use, ours lasted longer than many!  


Based on the symptoms, it sounded like this is what had happened to my monitor - the charge port had come un-soldered.  Before taking apart the monitor to confirm, I reached out to a local computer repair shop to see if they had someone who could re-solder the charge port if that was, indeed, the issue (emphasizing that it was a tiny part).  When he confirmed he could help, I then got brave enough to open up the baby monitor to take a look!  

Using a tiny Phillips head screwdriver, I first removed the plastic battery cover on the back of the parent console, removed the battery pack, and then removed the second screw located underneath the battery.  I then used a tiny flat head screwdriver to gently pry open the baby monitor along the seam around the outside edge.  This took a bit of finagling to locate exactly where the fasteners were located, but I was eventually able to gently pry the front and back of the baby monitor apart, revealing the circuit board.  As soon as I did this, a small part fell right out of the inside of the monitor - sure enough, it was the charge port!  The solder joints had come completely undone, resulting in the port being totally loose inside there - no wonder it wasn't working!  


I took the loose charge port and the disassembled parent console to the computer repair shop, where they re-soldered the charge port onto the circuit board.  I put everything back together again - snapped the 2 sides of the baby monitor back in place, and replaced the 2 screws and battery pack, and presto - the baby monitor now recognizes the charge cord!  This repair cost around $50 for the solder job; considering a new baby monitor system with 2 cameras would have run around $200, going the repair route was a significant cost savings, kept a baby monitor and 2 cameras out of the landfill, and saved me the hassle of programming and re-wiring new cameras!

Monday, February 5, 2018

DIY: Painted Brick Fireplace


I have wanted to paint our brick fireplace since we first bought this house 6+ years ago; however, the brown brick looked OK with the then-tan wall color, and we were SO sick of painting...so it fell on the back burner.  We just had the living areas repainted a light gray, and as soon as the painters left, I knew the brown brick had to go.  It was finally time for a white-painted brick fireplace!

B wanted to have the painters come back to handle it, but I read a few articles online and thought we could DIY (plus, immediate gratification instead of waiting on an opening in the painters' schedule).  If you're thinking of painting your brick fireplace, DO IT!  It's both inexpensive and straightforward but makes a big difference in the whole room's look.  Here's what we did:

Supplies:
1 wire scrub brush (we used one similar to this)
Vacuum cleaner with upholstery attachment (we used our Dirt Devil Scorpion)
1 spray bottle
1 plastic scrub brush (we used one similar to this)
2-3 cups vinegar
1 tube paintable caulk (we used this kind in a squeeze tube since we don't have a caulk gun)
Painter's tape (we used Frog Tape)
Plastic drop cloths
2 paint trays
2 angled paint brushes (we tried several; this one worked the best)
1 gallon masonry primer (we used Zinsser 123 primer)
1 gallon interior latex paint (we used Benjamin Moore Simply White in semi-gloss finish)


Step 1: Scrub

We used a wire scrub brush to scrub away at the brick, paying particular attention to the area right around the firebox that had soot buildup from the previous owner, who used wood in the fireplace (we have since switched it over to gas logs).  The goal here is to loosen any debris or dust on the face of the brick, as well as in the mortar lines.


Step 2: Vacuum

We used an upholstery attachment on a handheld vacuum to brush and clean the brick surface.  The upholstery attachment helps brush out any dust or debris that might be stuck in the mortar lines.


Step 3: Clean

Several articles I read recommended TSP, but I didn't want to use anything that harsh with an infant in the house.  We used undiluted white vinegar in a spray bottle, saturating a small area of the brick at a time and scrubbing it with a scrub brush.  This should further remove any remaining dust or buildup on the brick surface, prepping it for better paint adhesion.  We allowed the brick to fully dry overnight.


Step 4: Prep

We applied Frog Tape to protect the trim and the wood floor around the brick, and covered the floor, firebox, mantle, and nearby furniture with a plastic dropcloth to protect it from paint roller overspray.


Step 5: Caulk

We caulked any visible cracks, both on the surface of bricks themselves, as well as in the mortar lines.  Since we were painting the brick white, I knew cracks would show up black against hte white paint and be even more noticeable.  The caulk directions said to allow it to dry for 2-6 hours, but we let it dry overnight to be extra safe.  After caulking, we re-vacuumed the hearth to pick up any bits of dried caulk that may have fallen.


Step 6: Prime

We primed the brick using a primer made for masonry, first rolling on primer using a thick-nap paint roller, and then using an angled paint brush to apply primer to the deeper mortar lines and edges that the paint roller was unable to reach.  We allowed the primer to dry overnight.  We used gray primer, which was a MISTAKE under white paint - it took 3 coats of white paint to cover all the gray.  Learn from our mistake and use white primer!


Step 7: Paint!

Finally! We used the same method to paint the brick as the primer - first, a thick-nap paint roller, followed by an angled paint brush on the mortar and edges.  We used Behr semi-gloss paint, color matched to Benjamin Moore Simply White.  It took 3 coats to cover the gray primer; if we had used white primer, we probably could have gotten away with only 1 coat - 2 at the most.  Remove the Frog Tape while the paint is still wet to avoid pulling off paint.


Step 8: Touch Up

After painting the brick white, the seam between the mantle and the fireplace, as well as the fireplace and the side trim, was noticeable - the gap looked like a black line between the white brick and the white mantle/trim.  We used the same white caulk to caulk in between the mantle and the brick, and the brick and the trim. It looks seamless now!  We also used a small craft paintbrush to touch up any spots we had missed with the white paint.


I LOVE the result!  Our whole living room feels brighter with the white brick fireplace instead of the dull brown brick!  I also love how much decorations "pop" against the white - our Halloween decorations show up so much better than they used to!

Monday, January 29, 2018

DIY: How to Clean a Pottery Barn Kids Backpack / Lunch Box

Pottery Barn Kids has the CUTEST backpacks and lunch boxes for littles, but those suckers aren't cheap!  Kids are rough on backpacks and lunch boxes with all the back-and-forth to school - the bags get dirty quickly!  


I was handed down a used PBK lunch box for my daughter that had DEFINITELY seen better days.  I checked the PBK website, where the care instructions say "spot clean with a damp white cloth".  Um, sorry, that's not gonna cut it!  

ATTEMPT #1 - I tossed it in the washing machine with a hefty dose of laundry detergent and Oxiclean, but it still looked pretty bad - especially on the lighter-colored straps and zippers.  Dang, Oxiclean normally fixes everything!  

ATTEMPT #2 - As a last resort, I scrubbed it with a plastic dish brush in the sink, using dish soap...and VOILA!  The stains came right out, both of the patterned fabric and the straps/zippers, with no damage to the pattern on the fabric.  It took a little elbow grease, but the dish brush worked amazingly well!  Since PBK's lunch boxes and backpacks are made of 600-denier polyester, they are pretty sturdy - that's the same material that must luggage is made of.

Give it a try!  You'd be surprised what you can salvage - PBK's stuff is so well-made, it can take a good scrub!

Monday, September 11, 2017

DIY: Pottery Barn Kids Inspired Growth Chart Ruler Tutorial

I've seen these wood growth charts at Pottery Barn Kids and loved the idea - tracking your kids' heights as they grow like our parents used to on a door frame or wall, but on something transferable in case you move or repaint.  But, like everything at PBK, the price tag was hard to swallow - $99?!  This is something I knew I could copy for a fraction of the cost, and it took less than an hour of effort (plus drying time).  My board cost less than $10, since all I bought was the wood board - I already had sandpaper, leftover wood stain, a black Sharpie, painter's tape, and Command strips on hand.


Supplies:
1" x 6" x 6' wood board (I bought this one from Home Depot for $8.78)
100-grit sandpaper
Wood stain (I used Minwax) or paint
Rags or brush for staining
Ruler
Black Sharpie
Painter's tape (I used Frog Tape)
Mechanical pencil with metal tip
Template for numbers - stencils or computer-printed numbers for tracing 
Command Velcro strips for hanging

First up - prep and then stain or paint the wood board.  Lightly sand the board using 100-grit sandpaper to even out any rough spots.  


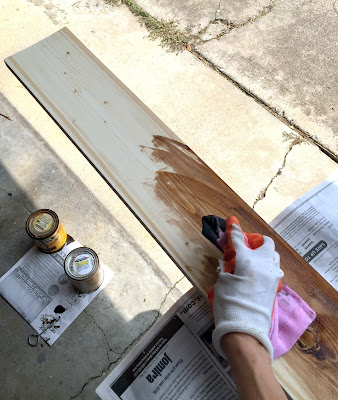
 I decided to stain mine; I mixed 2 colors of Minxax stain that the previous owner of our house left in the garage (one was too light and one too dark, so I mixed them to make a mid-tone color).  


Apply the stain using some rags (specifically, my husband's old holey undershirts that I cut up into rags for projects like this), making sure that the front, top, bottom, and side edges were all evenly stained.  I did not stain the back, since it won't be visible and it would have added to the drying time.  

Let the board dry until it is no longer tacky to the touch (the can said this would take 4-6 hours; I let it dry overnight).


Once the stain or paint is dry, use a ruler and a black Sharpie to mark small dots along the edge of the board every inch.  


Next, you'll mark the "foot" lines; to do this, first decide how high you want to hang the board. I decided to hang mine 6" above the floor (to allow room for the baseboard), so the "1 foot" line would be 6 inches (not 12) from the bottom of the board.  This means that the board can be used to measure up to 6'6" in height overall.  Apply Frog Tape down the length of the board so that all the lines would be the same length, with the foot lines being just shy of 1/2 the width of the board.  Using a Sharpie, use a ruler to draw a line from the left edge of the board to the Frog Tape, beginning at 6" from the bottom of the board and every 12" thereafter.


After labeling the "foot" lines, move the Frog Tape approximately an inch closer to the left edge of the board to draw the "quarter" inch lines (e.g., 1/4 inch, 1/2 inch, and 3/4 inch), which are really 3 inches, 6 inches, and 9 inches from each "foot" line.

Finally, move the Frog Tape another inch closer to the left edge of the board to draw the "eighth" inch lines (e.g., 1/8, 2/8, 3/8, etc.), which are the 1, 2, 4, 5, 7, 8, 10, and 11 inch marks in between each "foot" line.


Print out a template for the number labels - I used Century Schoolbook font in size 275 in Microsoft Word.  Using a mechanical pencil with a metal tip (with the lead pushed in so the metal tip was exposed), trace the outline of each number just beneath the applicable "foot" line by pressing the metal tip of the pencil through the paper; the wood should be soft enough that the pencil leaves a visible indentation.  


Use the black Sharpie to trace over the indentation and color in the interior of the number.

I haven't hung my board yet since we're having the house painted next week, but I plan to use Command Velcro strips to hang it on the wall (the large size support up to 16 lbs, and the board weighs approximately 5 lbs).  Follow the directions - including wiping the wall with isopropyl alcohol beforehand - exactly for best results!

Monday, September 4, 2017

DIY: Faux Chenille Baby Blanket Tutorial


I made one of these faux chenille blankets when I was pregnant with my son and used it as the backdrop for all his monthly baby pictures; despite the time-consuming process to make it, I wanted my daughter to have one of her own (#secondchildequality).  It's a good thing I'm not planning to have a ton of kids because I'm not sure how many more of these blankets I have in me, but I LOVE the end result and hope it is something my kids will keep forever.

Let me begin by saying I am VERY beginner-level at sewing.  I haven't sewn anything since my last pregnancy, so....nearly 3 years of complete inactivity.  This blanket really only requires the ability to sew in straight lines, so if you can do even the basics on a sewing machine, you can do this!


 Supplies:
  • 1.25 yards patterned fabric
  • 3 x 1.25 yards 100% cotton flannel (solid colors)
  • 2 x 250-yard spools thread that matches the patterned fabric (plus a 3rd spool of thread if your quilt binding is a different color)
  • 2 x 3-yard double-fold 0.875-inch-wide quilt binding
  • Fabric marking pencil
  • Yard stick
  • Safety pins
  • Straight pins
  • Slash cutting tool

First, fabric selection: you will have one patterned fabric that will be the "front" of the blanket, and then 3 colors of cotton flannel will be used to make the faux chenille texture.  The "front" patterned fabric can be whatever fabric content you want (mine happened to also be cotton), but the 3 colors of flannel MUST be 100% cotton in order for it to fray properly.  The flannel doesn't have to be solid colored, but any pattern on it is not really going to show up once you cut the chenille, so solid is usually easiest and cheapest. If you're going to spend money somewhere, spend it on the "front" patterned fabric and get cheaper solid flannel for the chenille.  My front fabric was $12.99/yard and the flannel was $2.99 yard, for reference.  The flannel colors you choose should coordinate (or contrast) with the "front" patterned fabric.  Similarly, the thread color should coordinate with the fabric (especially the "front" patterned fabric) so that it blends in and hides mistakes/wonky lines.  The quilt binding can either match or contrast your other fabrics, depending on your preference.

For this blanket, I used a pink-patterned floral fabric for my "front" patterned fabric, and 3 varying colors of pink flannel for the chenille.  I used pink thread and navy contrasting quilt binding (note: if you use contrasting, rather than matching, quilt binding, you will need a 3rd spool of thread in a color that matches the binding).  By using 1.25 yards of each fabric, you should end up with an (approximately) 45-inch square blanket.

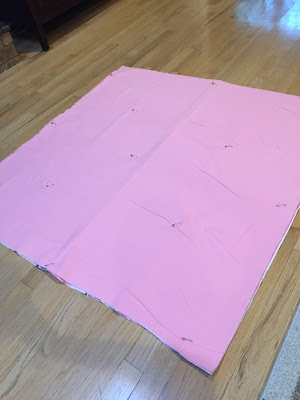
The first step is prepping the fabric.  I do not wash mine in advance because I am brave/lazy like that and do not like trimming all the threads that come loose if you pre-wash.  You run some risk of shrinkage in the finished product this way, but I did it anyway.  Lay the "front" patterned fabric upside down (wrong-side facing up) on the ground.  On top of it, layer the 3 solid-color flannel fabrics.  The color on the very top (furthest from the "front" patterned fabric) is the color that will be most visible, so put your preferred fabric color on last.  Use scissors to trim any uneven edges if your fabric doesn't line up perfectly.


Use 10-12 safety pins to pin the 4 layers of fabric together, since the fabrics will shift some while you are sewing.  Since this is a project that will likely take several days to complete, I like to use safety pins instead of straight pins since they are more secure.  


Flip your pinned fabric over and use a yard stick to draw a straight line with a fabric marking pencil from one diagonal to the other.  This will be the first line you sew, and you will work your way outwards to the corner.


Finally - time to start actually sewing!  You will go through many, many bobbins of thread while making this project, so I like to thread at least 3-4 bobbins at a time to limit the number of times I have to stop sewing to rethread bobbins.  Make sure to sew with the "front" patterned fabric facing up, because the stitching on this side will be more visible than it will be on the back/chenille side, so you want to make sure you aren't bunching the fabric.  Start by sewing a straight line from one corner to the other on the pre-marked line.  This is the longest line you will have to sew, so they get shorter from here!  Backstitch at the beginning and end of each line to avoid unraveling once you start cutting the chenille.

After completing the first line, shift the fabric to the right so that the right edge of the presser foot is aligned with the line you just sewed.  I find it helpful to roll up the excess fabric to keep it from bunching too much against the machine.  Sew another line, keeping one-presser-foot distance from the first line.  


Keep doing this, sewing lots and lots (...and lots) of straight lines until you eventually reach the left-hand corner of the fabric.  When you reach the corner...you are halfway done!  Turn the blanket around (with the "front" patterned fabric still facing up, but moving the completed half to the right-hand side and the uncompleted half of the blanket on the left) and do the same thing for the other half of the blanket.  If you run out of thread in either the spool or the bobbin mid-line, don't worry - just reload, backstitch, and keep going.  There will be so many lines that it won't be noticeable in the finished product :)

Once you are done sewing lines, it's time to start cutting the chenille!  You will want a slash cutting tool for this part - trust me!  I can't even imagine cutting this many lines with scissors.  

Place the blanket on the ground or flat surface with the flannel side facing up.  You want to cut the 3 flannel layers in between each line WITHOUT cutting the "front" patterned fabric.  I find it easiest to use a small pair of scissors to snip the flannel between each sewed seam to "start" the cut - it makes it easier for the slash cutter to do the rest of the work without having to pull too hard.  

Then, stick the slash cutter under the 3 flannel layers (but on top of the patterned fabric) and push the tool, parallel to the ground, towards the other end of the blanket to cut through the flannel layers.  Cutting 3 layers of flannel at once, many, many times (between each pair of lines) will dull the slash cutter blade quickly, so when it starts becoming more difficult to push the tool to cut the fabric, make sure to rotate the blade to reveal a "fresh", sharp section of the blade (if you don't do this and use a dull blade, you will eventually use so much force to push the tool that you will rip out a seam).  You will also have to pick flannel lint out of the blade every few cuts to keep the blade from getting clogged up.


Once you have cut the flannel between all of the lines, use a yard stock to "square up" the edges of the blanket and trim off any excess fabric (since it likely shifted some during sewing), including the fabric selvage on the "front" patterned fabric.  Don't worry if trimming involves cutting off some of the backstitching on the lines you sewed - the quilt binding will ensure that the seams don't unravel.  


If you want your blanket to have rounded edges like mine, use a rounded object (I used a salad plate) to trace and then cut a rounded edge on each corner.  Trim off any remaining loose threads.


The last labor-intensive step - the quilt binding!  Use straight pins to pin the quilt binding around the outer edge of the blanket, making sure to sandwich all 4 fabric layers between the 2 sides of the quilt binding.  


If your binding is a contrasting color, make sure to rethread your sewing maching with an appropriate thread color to blend in (my beginner sewing skills make sewing on the quilt binding the hardest part of the whole process, so I like to hide my mistakes as much as possible with thread that blends in!)  Use your sewing machine to sew along the inner edge of the binding - as close as possible to the edge while still "catching" the binding on both sides of the blanket (I check the back side every few inches to make sure my seam isn't running off the binding).  This part is very slow and steady for me, and involves a lot of seam-ripping and re-doing, especially when going around the rounded corners (but again....beginner-level skills).  


Once you're done, double check the binding to make sure that there aren't any gaps in the seam all the way around.  When you're satisfied that the edges of the blanket are fully encased in the quilt binding, it's time to wash!  Wash the blanket (a regular wash cycle on cold water should be fine).  Because I didn't pre-wash my fabric before sewing, I use a Shout Color Catcher sheet to soak up any dyes that might run during washing.  Make sure you wash the blanket BY ITSELF - the cut flannel will generate a huge amount of lint that you don't want sticking to other things in the same wash load!!  Machine dry the blanket on low or medium heat; if you remember, clean out the lint filter halfway through the drying time because IT WILL BE FULL.  Like, really full.


When the blanket is dry, admire all the flannel that has fluffed up into a soft chenille texture!  You did it!  It may be time- and labor-intensive, but the end product of seeing all those lines of chenille is worth it!


Wednesday, August 30, 2017

DIY: Pottery Barn Patio Furniture Refresh


I'd been wanting a couch or sectional for our back patio for a while now; our toddler loves spending time in the back yard, so we spend tons of time out there with him.  We have a dining table and a couple of wicker chairs on the patio, but a couch seems so much more comfortable!  I started shopping around online and realized that patio furniture is NOT cheap - especially couches and sectionals since the cushions really add up in addition to the cost of the furniture itself!  On the low end, IKEA outdoor couches and sectionals start at $400-500, and more mid-priced options are well over $1,000-1,500.

Enter a secondhand sectional!  I LOVE Facebook garage sale/resale pages - the one in our neighborhood is especially active and great deals can be scored on there all the time!  I like that our page is local (meaning we won't have to drive too far to pick up), and it feels less shady than buying off Craigslist (since you have to know someone personally to get into the group and I can check out our mutual friends before buying).  

One of my friends from the neighborhood bunco group posted her Pottery Barn Chatham sectional for only $50 - it was in good shape but they're changing their patio setup to accommodate a dining table and needed it gone!  It's still sold at Pottery Barn - for the configuration she was selling (including coffee table and cushions), it costs a whopping $2,381 new (plus over $500 in shipping and taxes).  Although it needed some TLC, I was willing to risk $50 on a $3,000 outdoor sectional!  


The cushions were a natural "canvas" color but had some mildew/mold from being left outside in the elements all winter.  The sectional and coffee table themselves are wood (mahogany) but had some slight fading from the sun (the coffee table worse than the sectional).  Overall, though, the cushions were still firm, there were no holes or rips in the fabric, and the wood was very sturdy.  My father-in-law came over last weekend with his pickup truck to help us pick it up, and then we went to town giving it a little refresh!

Luckily, the cushion covers zip off!  I ran them through the washer with a hefty dose of Oxiclean, which got rid of many of the stains.  For the tougher mold/mildew stains, I tried Oxiclean spray, soaking in Oxiclean and hot water, and borax, which all helped some but didn't do the job completely.  Finally (I wish I had started here), I mixed up a solution of 1 part bleach to 8 parts water in a spray bottle.  The fabric care instructions say not to use non-chlorine bleach, but I tested the colorfastness on a hidden part of the fabric and it didn't change the color, so I decided to go ahead.  

The bleach spray worked great and got rid of EVERY trace of mold or mildew that was on the covers!  They look brand new!  I was thrilled with this since new cushions alone run over $500 (before shipping or tax!)  Since the inserts were in good shape, once the covers were clean, they were good to go!  We plan to bring them inside (or store in a deck box) when not in use to keep them from getting so mildew-y again, since I am not sure what the effects of continued bleaching might be (plus they are a hassle to zip on and off).

As for the sectional and coffee table wood, the stain was still in pretty good shape, but there was some sun bleaching and the wood was looking a little dry.  Since the Pottery Barn website says they are made from mahogany and the wood wasn't heavily varnished, we refreshed the wood using this teak oil.  We applied a couple of coats using rags (my husband's old hole-y undershirts).  It took less than an hour for the two of us to do the entire sectional plus the coffee table.  The sectional looks SO much better!  The coffee table was in worse shape so it looks better but still not perfect (it probably needs to be sanded and restained but we didn't want to hassle with trying to match the stain on the sectional right now).  We let the wood dry outside for a couple of days before putting the cushions back on.

Overall, we are thrilled with how it turned out - especially considering it was only a $60 investment ($50 for the furniture and $10 for the teak oil).

Monday, August 28, 2017

DIY: Pottery Barn Kids Harper Look-alike Curtains


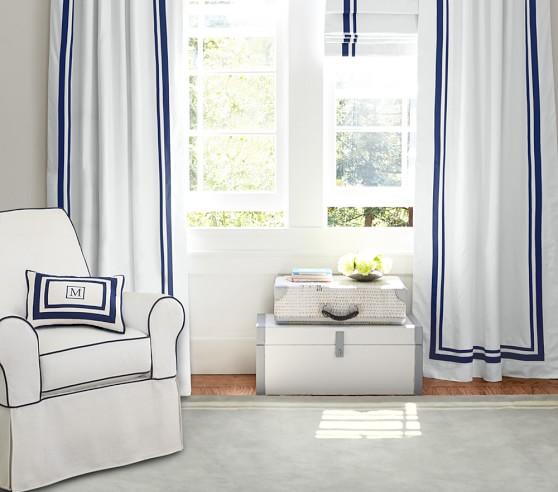
I am in love with Pottery Barn Kids stuff for baby and toddler rooms, but sometimes the price tag is just too much to swallow!  When I started planning C's "big boy" room, I loved the look of the PBK Harper curtain panels, but (for the 96" length I wanted), they are $79 (+ tax and shipping) EACH!  

Image result for pottery barn kids harper curtains


As much as I love them, I could not justify almost $200 on curtain panels for my toddler's room!  Like I did a with the rugby striped curtains in the nursery, I decided to try to DIY a less expensive version with a similar look.  

Supply list:


I bought a pair of 98" white RITVA curtains from Ikea for $24.99 (for the pair! I just tossed the included curtain tie-backs since I wanted the panels to hang straight.)  To be fair, these are not true blackout curtains like the PBK ones are, but we have plantation shutters that block out plenty of light, so blackout curtains weren't necessary for us.  
Image result for ikea ritva curtains

I wanted a similar look to the navy and white Harper curtains, so I bought navy grosgrain ribbon in both 5/8" and 2.25" widths on Walmart.com.  I got a 10-yard spool of the 2.25" ribbon and 3 5-yard spools of the 5/8" ribbon, which cost a total of $14.53.

Since the curtains are 100% cotton and say they have approximately 4% shrinkage, I washed and dried the curtains before starting to make sure that I didn't encounter any unwanted shrinkage or bunching in the final product.  And, since they are 100% cotton....they came out a wrinkled mess!  I spent FOREVER ironing them (with steam! and starch!) to get them flat again.  

After ironing, I hung the curtains up on the curtain rod in C's room to see how much excess length there was.  Since we have 96" ceilings and the curtain rod is a few inches from the ceiling, the 98" length was slightly too long.  I used straight pins to pin the curtains to the desired length (just skimming the floor).  Make sure to do both panels since they may have shunk to slightly different lengths!

After pinning up the excess, I used iron-on hem tape to hem each panel.  This would also be easy to do on a sewing machine, but I already had hem tape on hand, and I didn't want to get my sewing machine out and set it up just to sew 2 straight hems.

Inline image 2

I laid each curtain panel flat on our living room floor to glue on the grosgrain ribbon using permanent fabric glue (make sure it is washable!)  

Inline image 3
Starting with the 2.25" ribbon, I used a small amount of hot glue to glue down the end at the top of the curtain panel (folding under the edge of the ribbon to keep it from fraying), then used the fabric glue to adhere the rest of the ribbon (since hot glue will probably come undone if the curtains are washed and dried, I didn't want to do the whole panel using hot glue).  I used a piece of cardboard as a template to make sure that I was keeping the ribbon straight and an even distance from the edge of the curtain panel.  I also used a large piece of cardboard under the curtain panel to prevent any fabric glue from soaking all the way through onto our hardwood floors.  

I applied fabric glue to the underside of about 2 feet of the ribbon at a time, then pressed it onto the curtain using my hand, before moving on to the next 2-foot section of ribbon. When I got to the corners, I again folded the ribbon (I did not cut it) to form a corner and used hot glue to secure it, since it held better (i.e., more immediately) than the fabric glue.


When I finished gluing the 2.25" ribbon all the way around each panel, I then glued down the 5/8" ribbon, again using a cardboard template to make sure I was keeping it an even distance from the 2.25" ribbon in a straight line.

I am so happy with the finished product!  It achieved the look I was going for at a fraction of the cost of the PBK version.  My total cost was less than $50 for 2 curtain panels (approx. $30 curtain panels + $15 ribbon + $5 fabric glue, since I already had the iron-on hem tape).

09 10