Monday, May 18, 2015

Baby 101: Maintaining Milk Supply

From the beginning, I was blessed with a great milk supply; during my 3 months of maternity leave, I stockpiled hundreds of ounces of frozen breastmilk by adding one pumping session a day to my breastfeeding routine.  

After returning to work, I was still able to pump enough milk to meet my son's bottle needs at daycare.  However, in the past month (he's 7 1/2 months old), I've had several noticeable dips in my milk supply.  I know that I need to pump 24 ounces a day to make his bottles for the following day (4 x 6-ounce bottles), and I went from a steady 32-ounce output to closer to 24 ounces, almost exactly meeting the next day's needs.  From what I've read online, this is normal; your body begins out overproducing in order to ensure that there is adequate supply, but generally, by 6 months, your body has adjusted to the amount of milk it actually needs to make.  That's all fine and well, especially since I have a significant freezer stash.  

However, I'll have random days where my output will dip even further, and I'll have to add an extra pumping session at night after C goes to bed in order to have enough milk for the next day's bottle.  That's when I start to panic a little bit that I'm "drying up" and might not be able to breastfeed to my 1-year goal.  Luckily, I've been able to recover from these temporary supply dips by doing the following:

1.  Drink a ton
 
I've never been good at drinking throughout the day; I tend to drink mostly at mealtimes.  I was diligent about drinking enough when I was pregnant, but I've slacked off since then.  If I don't drink enough, I'll definitely see it in my milk supply.

2.  Add Gatorade.  

Let me preface this by saying that I am not a Gatorade fan, so this isn't one of those convenient excuses to allow myself to drink Gatorade.  But, I've seen multiple things online about Gatorade boosting milk supply (something about the electrolytes, in addition to the hydration factor).  I think coconut water is supposed to do the same thing, but I think it tastes awful.  I've started buying Gatorade at the grocery store and forcing myself to down a glass every day.

3.  Eat enough.  

Your body expends a lot of calories to produce milk; I've read online that it's somewhere in the neighborhood of 20 calories per ounce.  Since the average baby consumes 25-35 ounces of breastmilk a day, that's 500-700 calories.  In the beginning, I was constantly STARVING due to breastfeeding; however, as the months have gone on, I don't feel the hunger as much (or maybe I've just gotten used to it).  If I'm not consciously consuming enough calories, it definitely impacts my milk supply.  High protein foods are great for this....as well as justifying ice cream on the reg :)

4.  Add galactogogues.  
   

Galactogogues are things that enhance milk supply.  There are herbs, like fenugreek, and medications, like domperidone, that you can take to enhance milk supply; however, I haven't used those, so I can't speak to their effectiveness.  There are enough galactogogues available at the grocery store that I've been able to maintain my milk supply using those.  Examples include: brewer's yeast, oatmeal, flaxseed, and almonds.  2 recipes I made constantly which contain several galactogogues are:

  • Coconut & dried fruit granola - almonds, flaxseed, oatmeal.  I ate this with Greek yogurt for breakfast almost everyday.
  • Lactation energy bites - brewer's yeast, oatmeal, and flaxseed.  These are a great snack and super quick to whip up, since they're no-bake.  As an added bonus, supposedly brewer's yeast is more potent if uncooked (so these may be more effective than the lactation cookies/bars that are all over the internet).


5.  Nurse or pump more.  

Lactation is a supply-and-demand equation.  Nursing more is the best option; just like during your baby's growth spurts, your body will produce more if the demand is there.  Allowing your baby to comfort nurse or nurse more often than normal can do wonders for increasing your supply.  If nursing more isn't an option (like during the day, since I work), adding a pump is the next best thing.  I normally pump 4 times a day on days that I work (once on my commute to work, and 3 times at work); however, if I need to boost supply, I'll pump again at night after C has gone to bed. 

If adding 1 pump a day (as suggested above) doesn't cut it, you can "power pump" for a couple of days.  To power pump, you pump for 20 minutes, stop for 10, pump for 10 more minutes, stop for 10, pump for 10 minutes.  This results in 40 minutes of pumping over a 60-minute period, but the stopping/starting simulates a baby's nursing pattern during a growth spurt.  Doing this for 2-4 days in a row can help boost your supply.

Friday, May 15, 2015

Friday Favorites

It's been a (busy) few weeks, but I'm back linking up with MomfessionalsGrace and Love, and  A Little Bit of Everything to share my Friday favorites!


1.  Old Navy Sleeveless Ponte Knit Dresses

  I feel like Old Navy is SO hit or miss...sometimes the quality is crap, the sizing is crazy inconsistent, and it's annoyingly overpriced unless they're running a 40% off sale....but sometimes there are great finds to be had on the cheap!  

I also love that Old Navy/Gap/Banana Republic allows you to combine your shopping cart among all 3 stores and shipping is free both ways over $50!  Don't know your size? Order both! It's easy to print out a return label, slap it on the package, and drop it in the mail for a no-cost return (I hate when companies charge you return shipping out of your refund!  Old Navy doesn't do that!!)

I now own this dress in both the blue stripe and the solid black.  I scored them when Old Navy was running a $15 sale and they are worth every penny!  The fabric is thicker than jersey and has some structure due to the darts on the skirt.  I think it is a cute wear-anywhere dress that can be dressed up with heels or dressed down with wedges or flip flops.  I normally wear an XS at Old Navy, but I preferred the slightly looser fit and longer length of a S on myself.

2.  Old Navy Tube Maxi Dresses

As a tall girl (I'm 5'10"), I went years without being able to find a maxi dress that was long enough.  Finally, Old Navy started making maxi dresses in a tall length (although bummer that they're only available online).  I love their tube dresses!  They are as comfortable as wearing pajamas and a great staple for the summer (and bonus, easy to nurse in!)  They are a slinky rayon/spandex fabric - not cotton like many maxi dresses - which means that I'm not as worried about the color fading or the length shrinking like many maxi dresses do.  I have both the blue print shown above and the solid black.

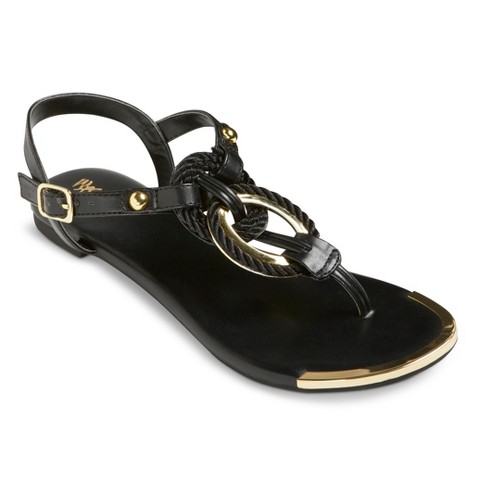
3.  Target Gabriela Braided Sandals

Woohoo!  My favorite Target sandals from last summer are back, and this year they're available in black (in addition to gold and silver).  I bought the gold ones last summer and wore the heck out of them, so I HAD to buy the black ones this year! (And I'm seriously contemplating buying another pair of the gold just in case something happens to my current pair).  They are comfortable, cute, and inexpensive!

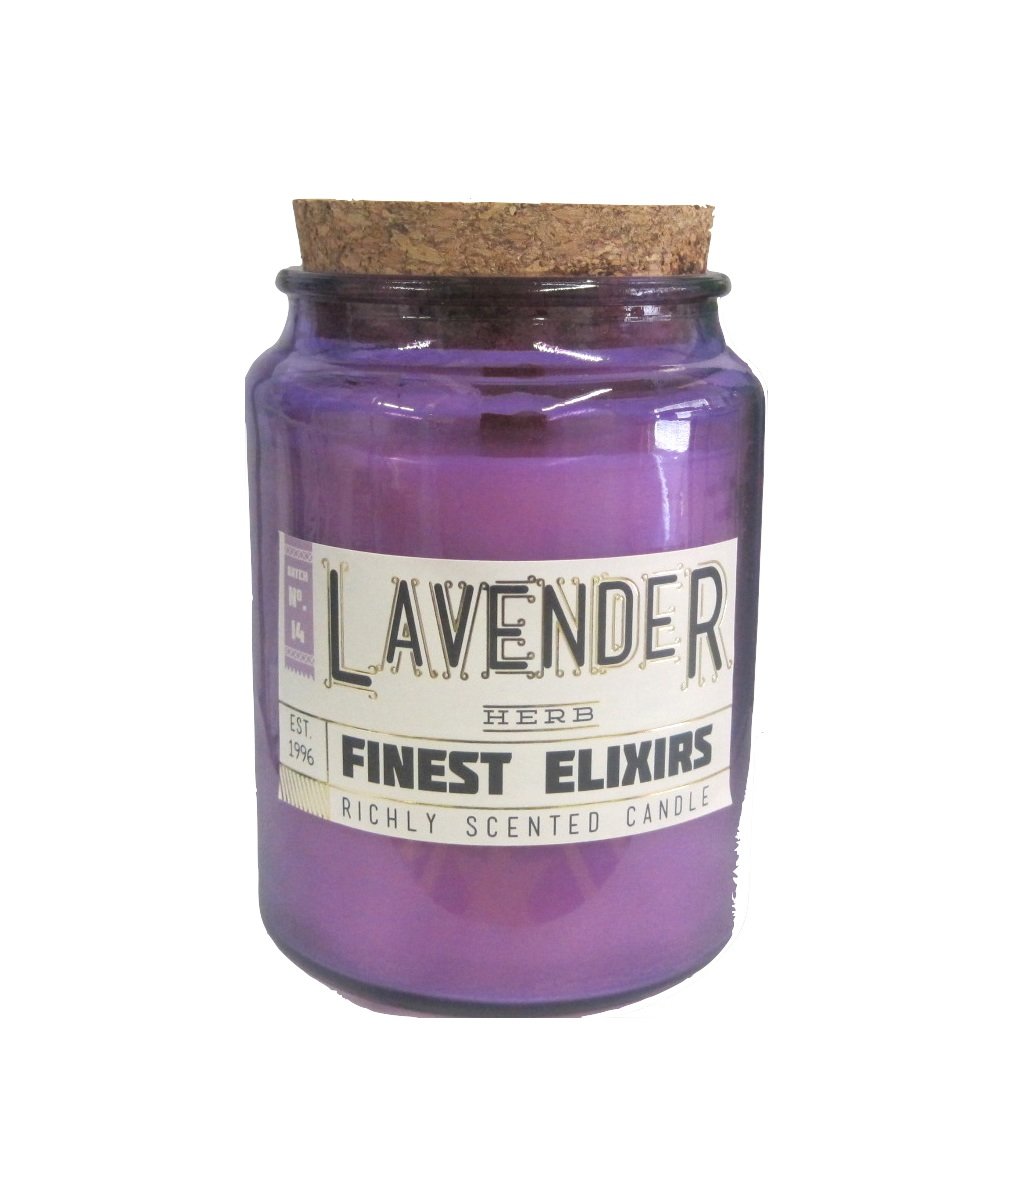
4.  Decoware Lavender Candle

I swear I can't step foot in HomeGoods without leaving with a new candle.  I picked up this one this week and am in love!  I love lavender because it reminds me of our wedding (our guests tossed dried lavender when we left the reception), but it's hard to find a good lavender candle that doesn't smell too fake.  This one is great!  I found it on Amazon but it's way more expensive (I paid $8 at HomeGoods)...I haven't bought this brand before but I'll have to pay attention for other scents on future HomeGoods candle impulse buys ;)

5.  This Cover-up


It hasn't come in the mail yet but I am super excited about this monogrammed cover-up!  Because MONOGRAMMED!  Do you follow Flaunt Boutique (@flauntboutiquetx) on Instagram?  They post cute clothes and accessories on Instagram which you can order by commenting "sold" with your email address and size.  This was a dangerous discovery because that is way too convenient.  They email you an invoice which you can pay with PayPal.  I can't wait for it to get here - I'm excited to wear it on our Mexico trip in August!!


Wednesday, May 13, 2015

Baby 101: Pumping while Traveling Without Baby

I recently had my first experience traveling without baby and pumping on a recent work trip.  Traveling with a baby is one thing - you can nurse anywhere - but figuring out what to bring, where to pump, etc. was overwhelming for me!  I consulted lots of fellow breastfeeding moms to ask about their travel tips.  Here's a summary of my experience:

Planning Ahead
Via

At multiple points during my trip, I knew there would not be a convenient or obvious place to pump. I did not have my own rental car during the trip, which would have been the easiest solution to pump.  To the extent possible, I tried to plan ahead and was surprised at how accommodating most places were.  I attended a conference at a university, and I was able to find contact information online for the university's women's center.  A quick email later, and they were happy to reserve their lactation room for me, even though I wasn't a student or faculty. 

I also found that Love Field airport has a dedicated nursing room available; I emailed the New Orleans airport to ask about a nursing or lactation room and, although they don't have a dedicated room, they offered to put a chair in a private family restroom to make pumping more convenient.  Overall, my experience has been that public facilities like airports, universities, churches, etc. are very accommodating to nursing or pumping moms!

I also called the hotel and verified that my hotel room had a mini fridge (to store milk) and microwave (for sterilizing) in the room.

Navigating Airport Security

Via

I was nervous about traveling with breastmilk by plane for the first time, but it turned out to be no big deal.  By TSA rules, you can bring an unlimited amount of formula or breastmilk onto a plane, whether your child is traveling with your or not -- the 3-ounce rule for liquids does not apply.  You can also bring cold packs or ice in your cooler to keep the milk cold.  Before going through security, I just had to notify the TSA agent that I was traveling with breastmilk and pointed out my cooler.  After it was x-rayed, another TSA agent took it aside and put the bottles of milk in a tester machine, I presume to verify that it was milk and not explosives or some other prohibited liquid (they did not have to open the bottles, or take a sample, or put anything into the milk to test it).  That was it - piece of cake.

Bringing the Right Gear


This was where tips from friends really helped - I would not have figured out half of this on my own!  Here's what I brought (and used) on my trip:

1.  Pump and power cord
(Duh.)

2.  Cooler
I had to use a larger cooler than I normally take with me to work, since I was going to be bringing back multiple days' worth of milk.  The cooler I use for work only holds 4-6 bottles, so I had to find a larger one for my work trip!

3.  Pump parts
(Again, duh.)  I put them in a Ziploc bag and kept them in my cooler.  Since this kept them cold, I didn't have to worry about washing the parts between uses while I was traveling.

4.  Pump vehicle power adapter
On this trip I didn't have my own rental car, so I ended up not pumping in the car; however, I still brought the car power cord just in case I got REALLY desperate and had to borrow someone's car to pump in.  In most cases, I have my own rental car when I travel, so I could use this to pump in the car.

5.  Nursing cover
This is a necessity for pumping in the car, especially during daylight hours.  I also used a nursing cover when pumping in rooms where I wasn't confident that the door locked securely, just in case someone walked in.  In these situations, I usually also put a chair in front of the door and sit facing away from the door. This turned out to be a good idea, because someone walked in on me when I was pumping at the university...I thought I had locked the door but I guess it didn't fully catch.  Luckily, there was a chair in front of the door (so the person coming in felt some resistance), I was facing the other way, and wearing a nursing cover, so the embarrassment factor was minimal.

6.  Pump battery pack
Yes, I brought 3 various power sources for my pump on this trip (normal power cord, vehicle adapter, and battery pack).  I didn't know what the setup would be, so I wanted to ensure I was prepared for any outcome!  I borrowed this from a friend so I didn't have to go out and buy my own, since I doubt I'll need it very often.  The Medela battery pack allows you to pump using 8 AA batteries instead of needing an outlet or a vehicle cigarette lighter (is that still what those things are called?)  I didn't end up using this, but it made me less nervous knowing that, if I got really desperate, I could pump in a bathroom stall somewhere without needing a power outlet nearby.

7.  Dish soap
I brought a mini bottle of Palmolive dish soap with me so that I could wash bottles and pump parts at the hotel each night.  I didn't have a bottle brush, so I just used super hot water and dish soap and did the best I could.  I still had the tiny bottle that they gave me in the hospital when C was born, so I brought that; if not, you could transfer some into a travel-size shampoo bottle.

8.  Pump cleaning wipes
I packed a few of the Medela sterilizing quick-clean wipes, just in case I needed to clean the pump parts mid-day before I was back at the hotel room (since I didn't want to wash them in the sink in a public restroom).  I ended up being able to keep the pump parts cold in my cooler bag, so I didn't worry about cleaning them during the day, but it was nice to have this as a backup.

9.  Microwave sterilizer bag
I don't normally sterilize bottles and pump parts daily, but since I knew I wouldn't be able to get them as clean as I normally do without a bottle brush, I sterilized the bottles and pump parts each night using the Medela sterilizer bags and the microwave in the hotel room.  This worked out great - I would not have thought of this if one of my friends hadn't suggested it!

10.  Hands-free bra
I use my hands-free pumping bra every time I pump, but I felt like it was critical on the trip.  When you're pumping in an unfamiliar place, it is helpful to be able to be hands-free...like when I had to pump while standing up in a private (one-person) bathroom (since there was nowhere to sit other than the toilet)!

11. Bottles and caps
I only brought 3 bottles on the trip, since they take up so much space -- 2 to pump into, and 1 to hold any extra milk that wasn't enough ounces to freeze (for instance, I freeze in 6-ounce quantities, so if I had only 3 or 4 ounces of milk, I'd store it in the 3rd bottle until the next pumping session when I had more milk to total 6 ounces).

12. Breastmilk freezer storage bags
I stored all my pumped milk in breastmilk freezer storage bags, since they take up less space than bottles.  I used the flange from the pump parts as a funnel to pour milk into the bags in 6-ounce quantities, and then kept the bags in the fridge in my hotel room (and then in my cooler in transit).

13.  Ziploc bags in multiple sizes
I brought (and used) multiple sizes of Ziploc bags on this trip.  I used sandwich or quart-sized Ziploc bags to hold ice in my cooler; normally, I use an ice pack, but I didn't have access to a freezer in the hotel so I knew I'd have to rely on hotel ice machine ice.  Putting the ice in Ziploc bags kept my cooler from being a wet mess. 

I brought a gallon-size Ziploc bag for each day of my trip to store my pump parts in after using them (in the cooler) since I only washed them once a day at night.  The bag was kind of gross with milk residue by the end of the day, so after I washed and sterilized the parts at night, I used a fresh bag for each day. 

I also brought a few extra gallon-size Ziplocs to store the freezer storage bags of pumped milk on the flight; I was nervous that the change in air pressure might break the seal on the freezer storage bags and cause a leak, so I put the bags of pumped milk into Ziploc bags as an extra layer of protection (I was not going to lose any precious milk on this trip!!!)

Monday, May 11, 2015

From the Kitchen: The Best Cinnamon Rolls (based on the Pioneer Woman's recipe)

These cinnamon rolls are addictive - I only make them a couple of times a year because somehow the entire pan disappears in our house.  That Pioneer Woman knows what she is doing!  This recipe has a couple of small modifications (read: shortcuts) from the Pioneer Woman's original cinnamon roll recipe and only makes half as many (about 18 cinnamon rolls instead of 36).  I make them in 2 pans - a 13x9" and 9x9" Pyrex.  They take a while to rise but the actual active prep time is so quick and easy!


The Best Cinnamon Rolls
Yield: ~18-20 large cinnamon rolls
Adapted from The Pioneer Woman


Ingredients:

Dough:
2 cups milk
1/2 cup vegetable oil
1/2 cup granulated sugar
1 package active dry yeast
4 1/2 cups flour, divided
1/2 teaspoon baking powder
1/2 teaspoon baking soda
1/2 tablespoon salt

Filling:
2 sticks softened butter
3 tablespoons ground cinnamon
1 cup granulated sugar

Icing:
1 lb powdered sugar (about 1/2 of a standard sized package)
1/2 teaspoon vanilla extract
1/4 cup milk
2 tablespoons butter, melted
1/8 cup brewed coffee
Pinch of salt


Directions:

Mix the milk, vegetable oil, and granulated sugar in a microwave-safe bowl or measuring cup.  Microwave for 1-3 minutes, until a thermometer dipped into the bowl reads between 100-110 degrees.  Give the mixture a final stir to distribute the sugar, and sprinkle the package of yeast on top.  Let it rest for 5 minutes.  Measure 4 cups of flour into a mixing bowl, and add the liquid mixture.  Stir the mixture until well combined, cover, and let rise for at least one hour.

After the dough rises, add 1/2 cup additional flour, baking powder, baking soda, and salt, and stir until well combined.  If baking on the same day, let the dough rise for another 30 minutes.  If baking the next day, place in the refrigerator overnight. (I think it is easier to roll them out using cold dough!)

To prepare the filling, mix 2 sticks of room-temperature softened butter, cinnamon, and granulated sugar until well combined (it should form a brown paste).  

To prepare the icing, mix all of the ingredients in mixing bowl, using a whisk.

To roll out the cinnamon rolls, generously flour a clean counter surface.  Using a rolling pin, roll the dough into a rectangle about 1/4" thick - at least 30" x 20".  Using a rubber spatula, spread the filling evenly across the top of the dough, making sure to reach all the edges.  Starting with one of the long edges, roll the dough tightly towards the other long edge of the rectangle,  Pinch the final seam to seal the filling inside.  Using a sharp knife, cut the dough into 1 to 1 1/2" slices.  Place the slices into greased pans (aluminum pans would work well, or glass Pyrex dishes), leaving a small amount of space between the rolls.  (I fit 12 rolls in a 9x13" Pyrex).  Allow the dough to rise in the pans for 30 minutes before baking.

Bake at 375 degrees for 15-20 minutes, until the tops are starting to lightly brown.  Remove from the oven and immediately drizzle with the icing, allowing it to cover all of the tops and edges of the cinnamon rolls.  Serve warm or reheat if serving later (they reheat really well!)

Click here to see my other Pioneer Woman recipes!
09 10