

I am in love with Pottery Barn Kids stuff for baby and toddler rooms, but sometimes the price tag is just too much to swallow! When I started planning C's "big boy" room, I loved the look of the PBK Harper curtain panels, but (for the 96" length I wanted), they are $79 (+ tax and shipping) EACH!
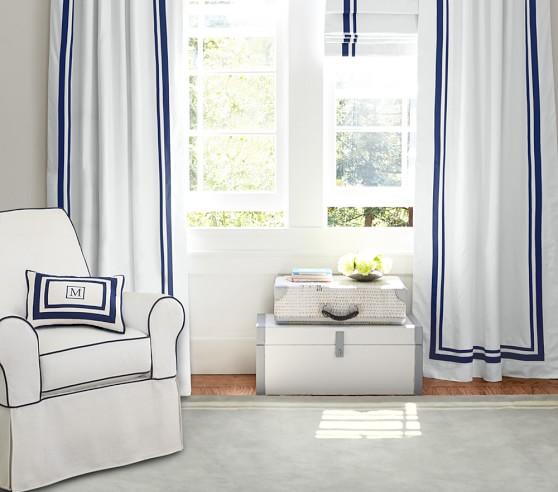
As much as I love them, I could not justify almost $200 on curtain panels for my toddler's room! Like I did a with the rugby striped curtains in the nursery, I decided to try to DIY a less expensive version with a similar look.
Supply list:
- Ikea RITVA curtains
- Iron-on hem tape
- Iron + ironing board
- 10 yards 2.25" grosgrain ribbon
- 10 yards 5/8" grosgrain ribbon
- Scissors
- Hot glue gun + glue sticks
- Permanent fabric glue
I bought a pair of 98" white RITVA curtains from Ikea for $24.99 (for the pair! I just tossed the included curtain tie-backs since I wanted the panels to hang straight.) To be fair, these are not true blackout curtains like the PBK ones are, but we have plantation shutters that block out plenty of light, so blackout curtains weren't necessary for us.

I wanted a similar look to the navy and white Harper curtains, so I bought navy grosgrain ribbon in both 5/8" and 2.25" widths on Walmart.com. I got a 10-yard spool of the 2.25" ribbon and 3 5-yard spools of the 5/8" ribbon, which cost a total of $14.53.
Since the curtains are 100% cotton and say they have approximately 4% shrinkage, I washed and dried the curtains before starting to make sure that I didn't encounter any unwanted shrinkage or bunching in the final product. And, since they are 100% cotton....they came out a wrinkled mess! I spent FOREVER ironing them (with steam! and starch!) to get them flat again.
After ironing, I hung the curtains up on the curtain rod in C's room to see how much excess length there was. Since we have 96" ceilings and the curtain rod is a few inches from the ceiling, the 98" length was slightly too long. I used straight pins to pin the curtains to the desired length (just skimming the floor). Make sure to do both panels since they may have shunk to slightly different lengths!
After pinning up the excess, I used iron-on hem tape to hem each panel. This would also be easy to do on a sewing machine, but I already had hem tape on hand, and I didn't want to get my sewing machine out and set it up just to sew 2 straight hems.
I laid each curtain panel flat on our living room floor to glue on the grosgrain ribbon using permanent fabric glue (make sure it is washable!)
Starting with the 2.25" ribbon, I used a small amount of hot glue to glue down the end at the top of the curtain panel (folding under the edge of the ribbon to keep it from fraying), then used the fabric glue to adhere the rest of the ribbon (since hot glue will probably come undone if the curtains are washed and dried, I didn't want to do the whole panel using hot glue). I used a piece of cardboard as a template to make sure that I was keeping the ribbon straight and an even distance from the edge of the curtain panel. I also used a large piece of cardboard under the curtain panel to prevent any fabric glue from soaking all the way through onto our hardwood floors.
I applied fabric glue to the underside of about 2 feet of the ribbon at a time, then pressed it onto the curtain using my hand, before moving on to the next 2-foot section of ribbon. When I got to the corners, I again folded the ribbon (I did not cut it) to form a corner and used hot glue to secure it, since it held better (i.e., more immediately) than the fabric glue.

When I finished gluing the 2.25" ribbon all the way around each panel, I then glued down the 5/8" ribbon, again using a cardboard template to make sure I was keeping it an even distance from the 2.25" ribbon in a straight line.
I am so happy with the finished product! It achieved the look I was going for at a fraction of the cost of the PBK version. My total cost was less than $50 for 2 curtain panels (approx. $30 curtain panels + $15 ribbon + $5 fabric glue, since I already had the iron-on hem tape).
Thanks for this. I really like what you've posted here and wish you the best of luck with this blog and thanks for sharing. Kids curtains
ReplyDelete